接下来,先介绍第一种:基于XML配置Bean。
一、Spring XML配置的形式管理对象(Bean)
1.1 基于XML配置Bean
1.两类对象实例化的方法:
(1)实例化对象:通过构造方法 ----------------- [ 90%以上的场景]
- 无参构造
- 带参构造
(2)实例化对象:通过工厂------------------------ [一般性了解]
- 通过静态工厂
- 通过工厂实例方法
2.语法
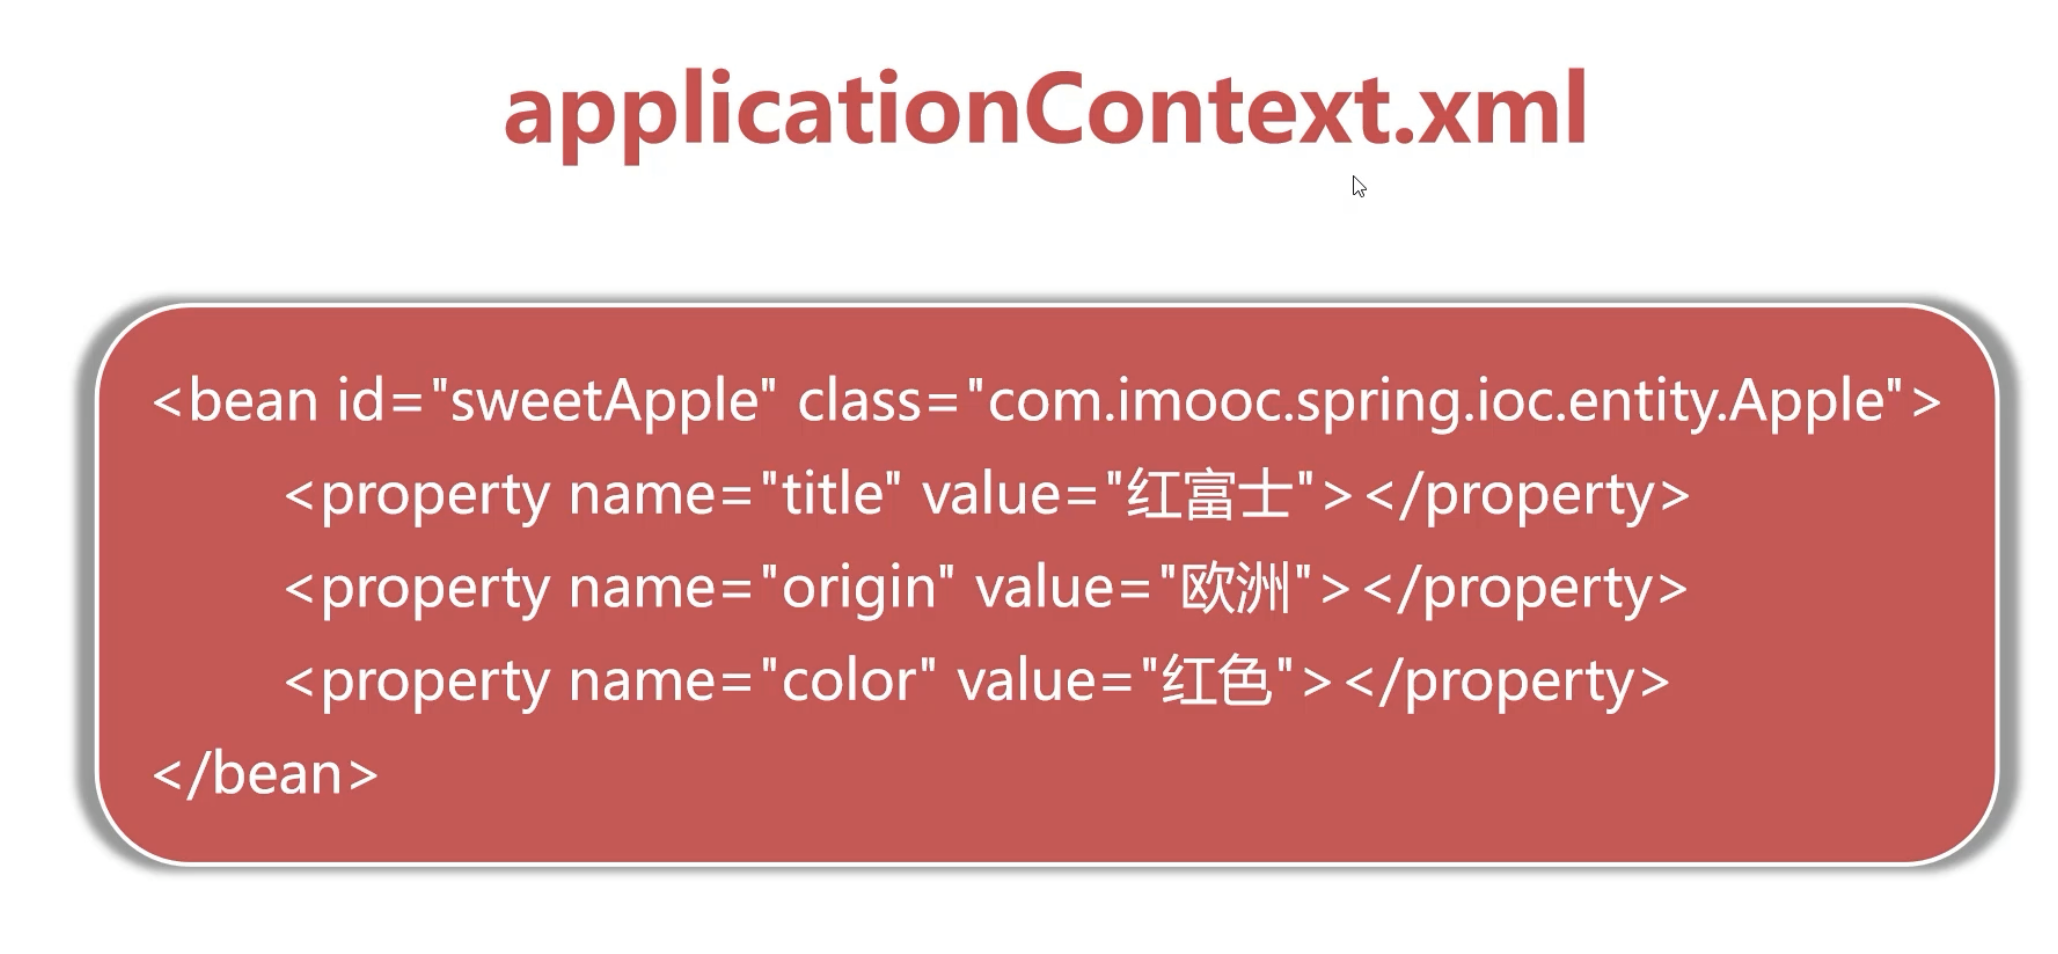
applicationContext.xml,是Spring IoC容器的核心配置文件:
所有对象的创建、对象间关联的设置均在此:
约定俗成,叫这个名儿
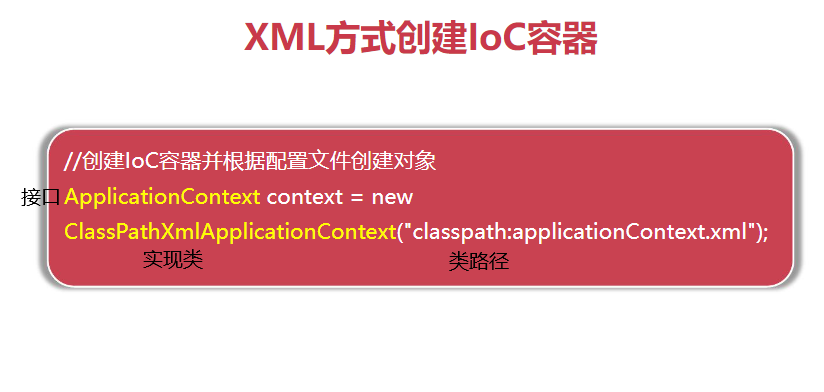
如何加载上述xml文件呢?
在应用入口类SpringApplication.java中:
3.编码演示:基于XML初始化IoC容器,并创建对象
前期准备
(1)
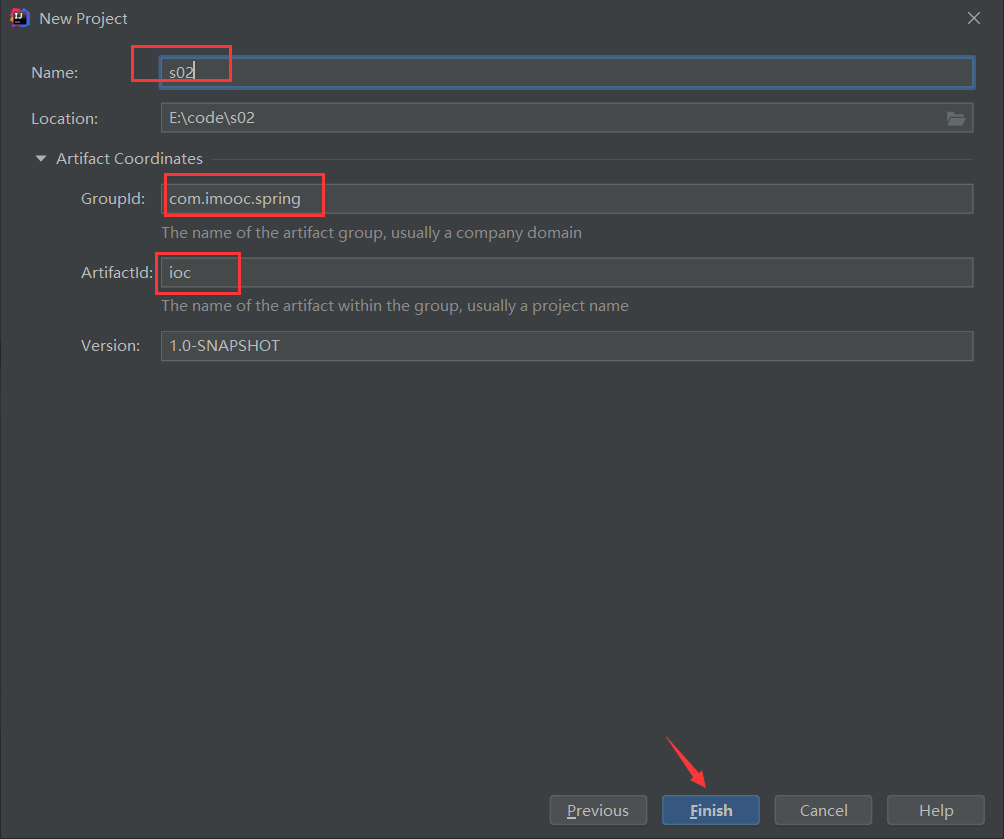
新建Maven工程s02:
增加工程说明文件readme.md:
讲解两类对象实例化的方法:
1.实例化对象:通过构造方法  [90%以上的场景]
  - 无参构造
  - 带参构造
2.实例化对象:通过工厂  [一般性了解]
  - 通过静态工厂
  - 通过工厂实例方法
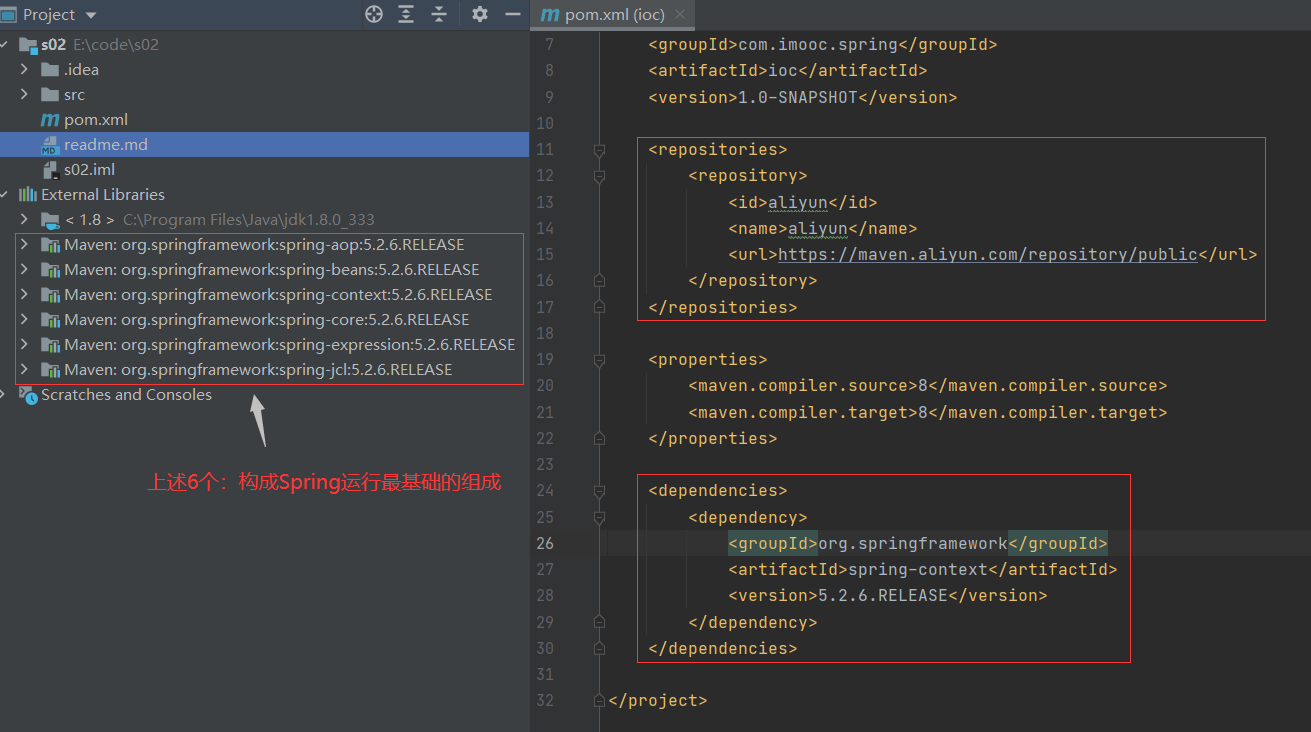
(2) 在applicationContext.xml中引入依赖spring-context:
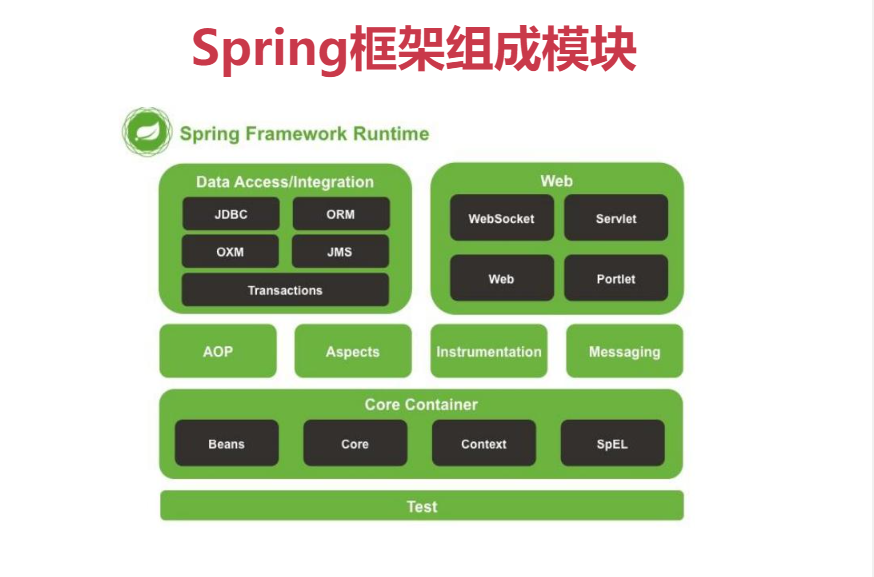
当然,Spring并不只有上述6个模块:
(3)
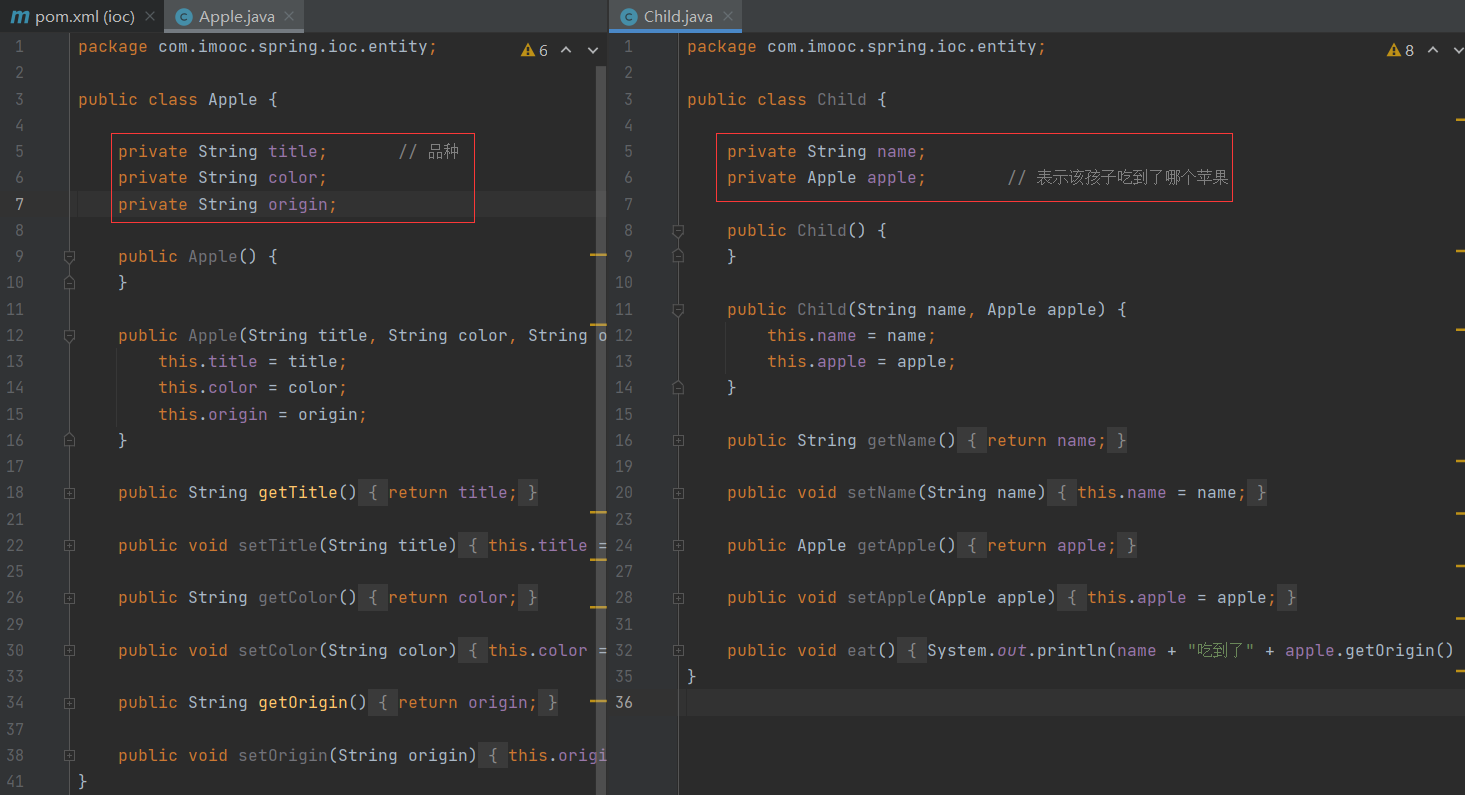
同样新建两个实体类:Apple、Child;及应用入口类。
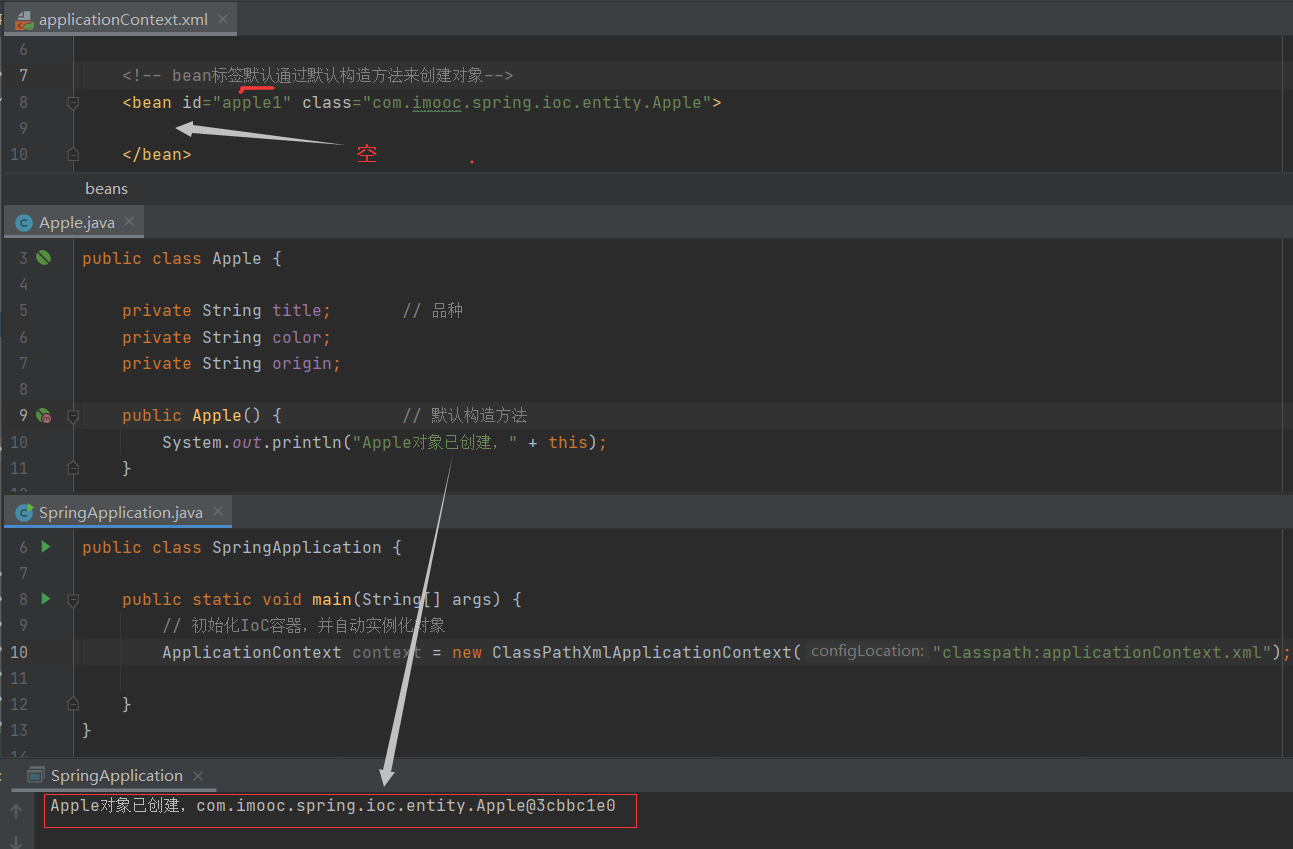
1.2 利用无参构造方法,来实例化对象:无标签
当bean标签啥都没有的时候,就会默认通过通过无参构造方法,来实例化对象:
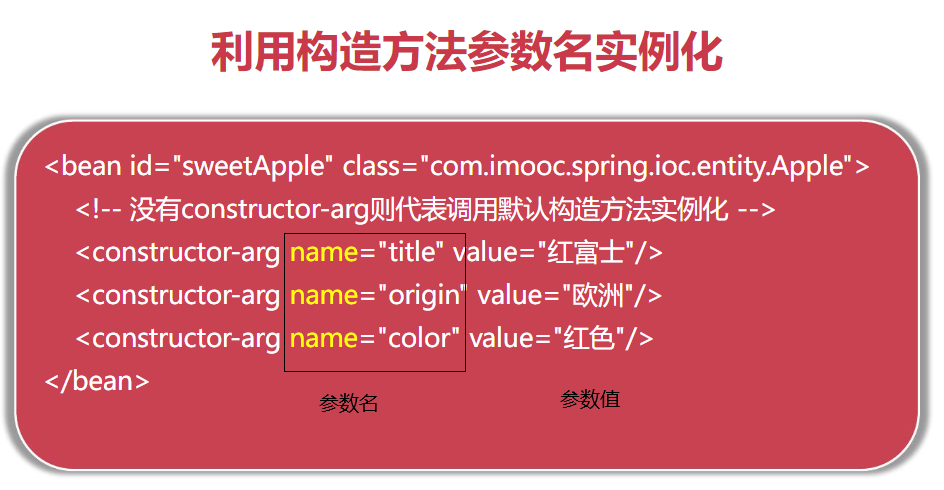
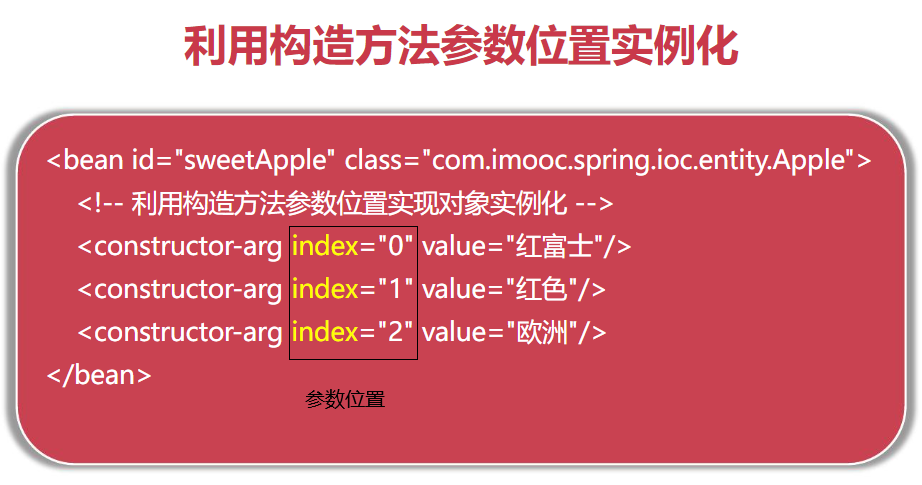
1.3 利用带参构造方法,来实例化对象:用constructor-arg标签
使用的是constructor-arg标签
1.实际工作中,推荐:
因为即使参数前后位置变动,也不影响
2.实际工作中,不推荐:
容易出错
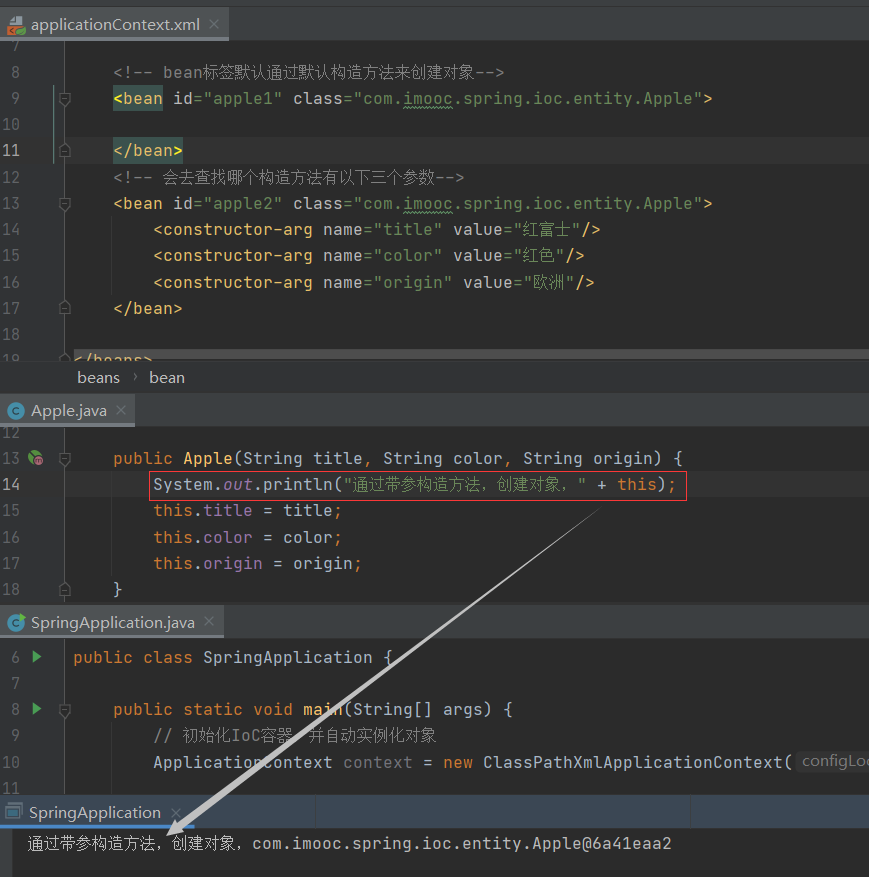
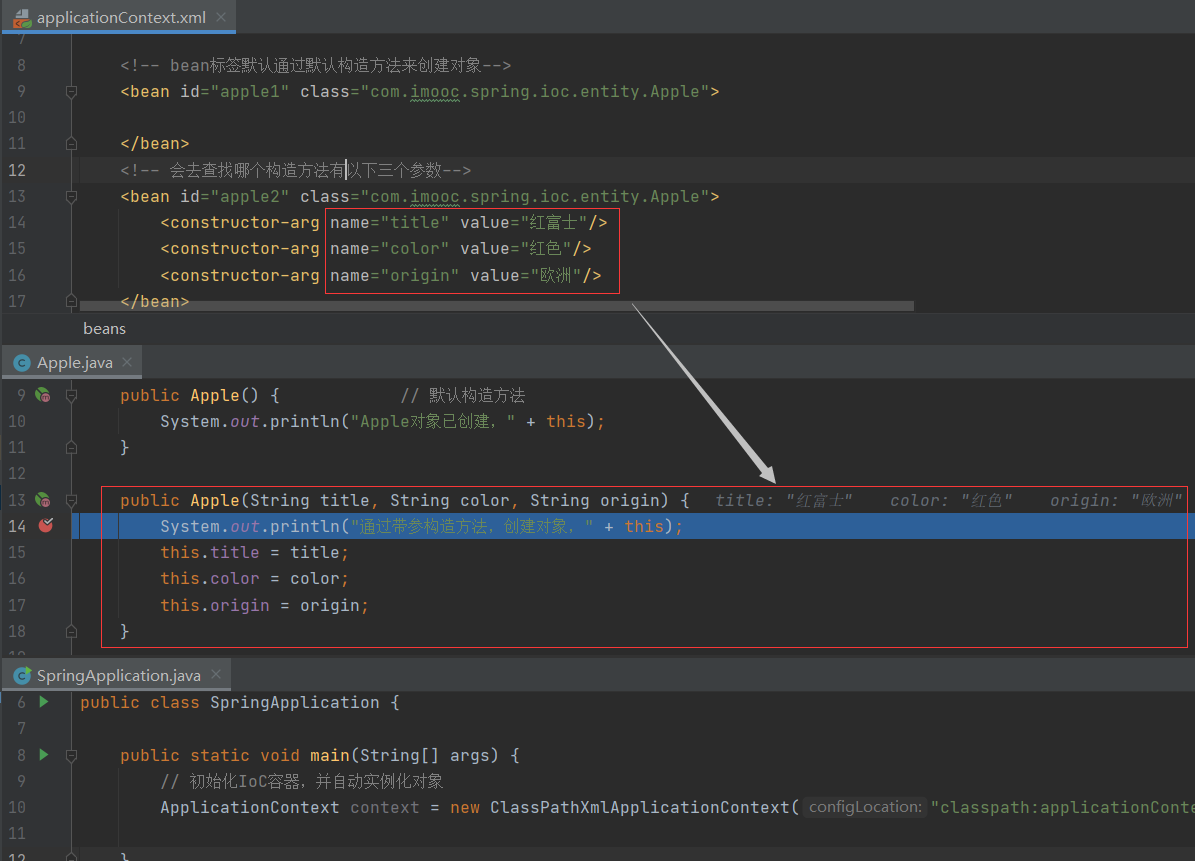
编码:
”在实体类Apple中,找到构造参数是下面三个参数(title、color、origin)的构造方法。然后,将参数值传入这个构造方法。“
通过调试:
得到了验证
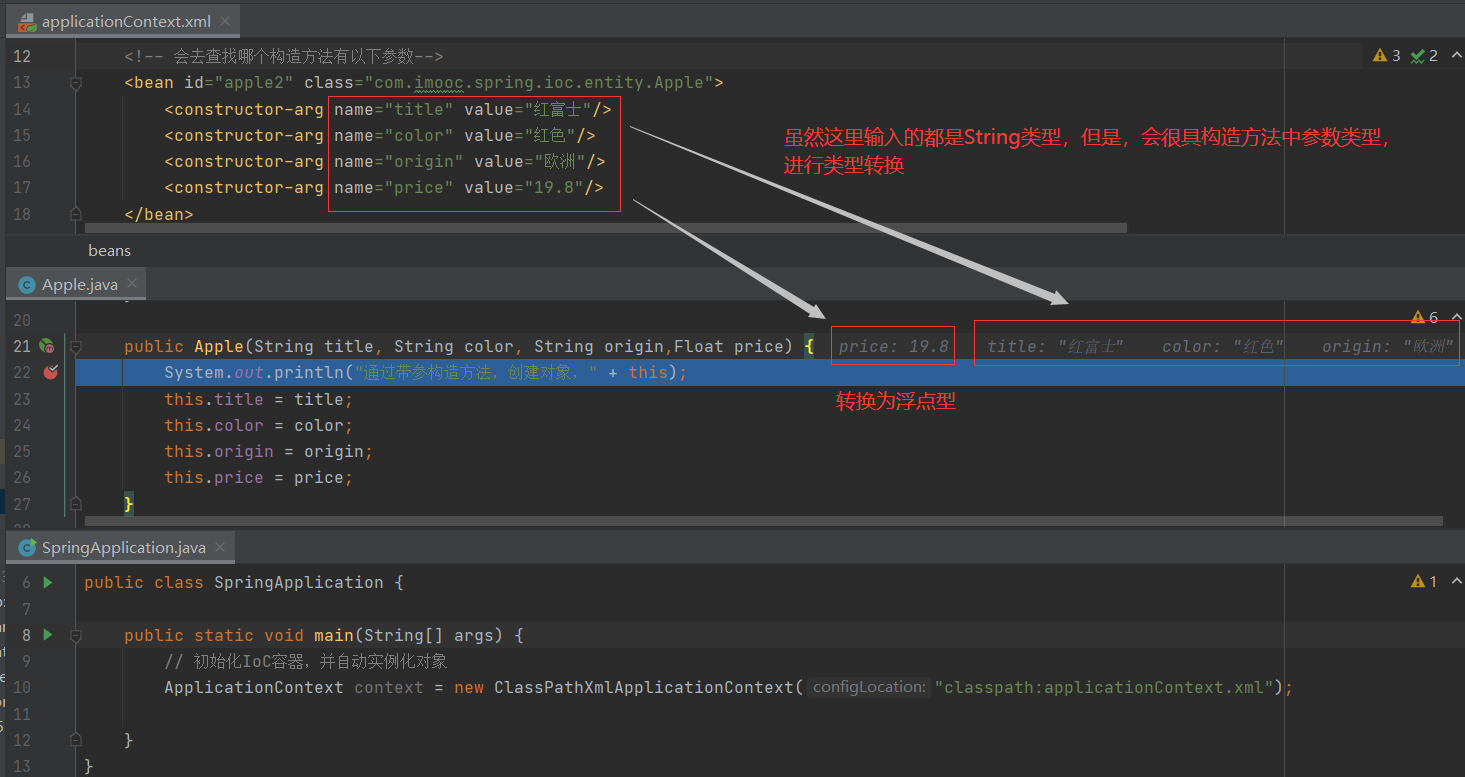
构造方法中的参数,并不强制为String,也可以为数字类型:
在配置文件中,虽然都是双引号包裹;但是,到了实体类中,会根据构造参数的类型,自动进行类型转换。
1.4 通过工厂,来实例化对象
1.工厂:
即工厂模式:隐藏创建类的细节,通过一个额外的工厂类,来组织创建对象。
实例化对象的方式:通过工厂 [一般性了解] ---------------- 本质:封装对应的方法,隐藏创建对象的细节。
- 通过静态工厂
- 通过工厂实例方法
如果还有比红富士更好的甜苹果,只修改工厂的内部代码,并不会影响到其他任何类的正常运行。
其实,这也是对象之间的解耦。
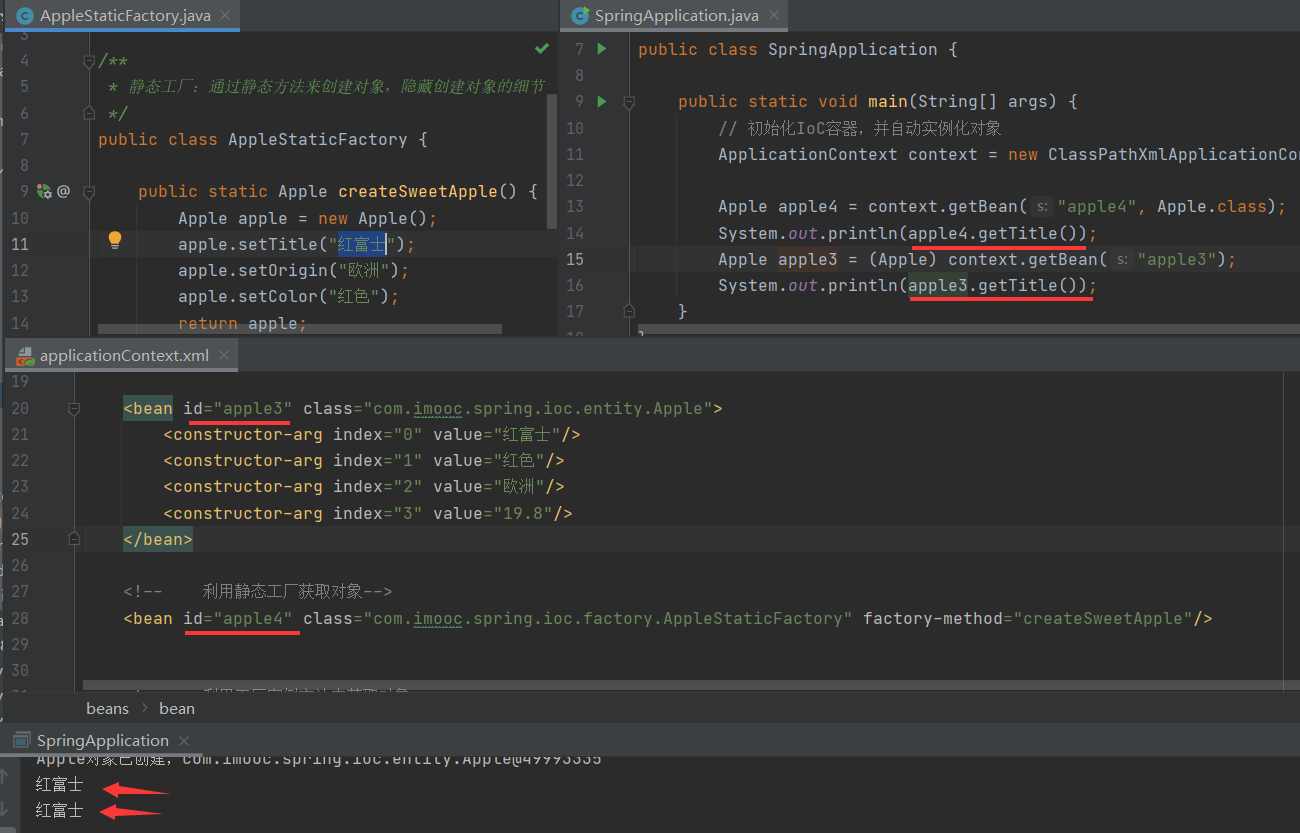
2.静态工厂:通过静态方法来创建对象,隐藏创建对象的细节
在AppleStaticFactory.java中:
import com.imooc.spring.ioc.entity.Apple;

/**
 * 静态工厂:通过静态方法来创建对象,隐藏创建对象的细节
 */
public class AppleStaticFactory {

    public static Apple createSweetApple() {        // static:属于工厂类本身,不属于工厂类的对象
        Apple apple = new Apple();
        apple.setTitle("红富士");
        apple.setOrigin("欧洲");
        apple.setColor("红色");
        return apple;
    }
}
在IoC容器的核心配置文件applicationContext.xml中:
<beans>
    <!--    利用静态工厂获取对象-->
    <bean id="apple4" class="com.imooc.spring.ioc.factory.AppleStaticFactory" factory-method="createSweetApple"/>
</beans>在应用入口类SpringApplication.java中:
public class SpringApplication {
    public static void main(String[] args) {
        // 初始化IoC容器,并自动实例化对象
        ApplicationContext context = new ClassPathXmlApplicationContext("classpath:applicationContext.xml");
    }
}
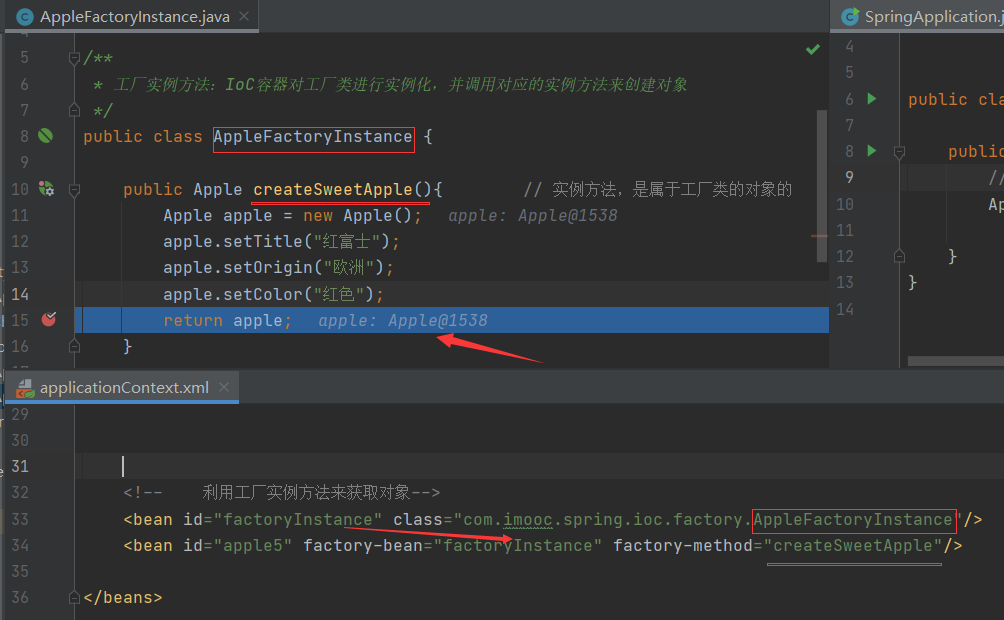
3.通过工厂实例方法来创建对象
在AppleFactoryInstance.java中:
/**
 * 工厂实例方法:IoC容器对工厂类进行实例化,并调用对应的实例方法来创建对象
 */
public class AppleFactoryInstance {

    public Apple createSweetApple(){        // 实例方法,是属于工厂类的对象的
        Apple apple = new Apple();
        apple.setTitle("红富士");
        apple.setOrigin("欧洲");
        apple.setColor("红色");
        return apple;
    }
}在IoC容器的核心配置文件applicationContext.xml中:
<beans>
    <!--    利用工厂实例方法来获取对象-->
    <bean id="factoryInstance" class="com.imooc.spring.ioc.factory.AppleFactoryInstance"/>
    <bean id="apple5" factory-bean="factoryInstance" factory-method="createSweetApple"/>
</beans>在应用入口类SpringApplication.java中:
public class SpringApplication {
    public static void main(String[] args) {
        // 初始化IoC容器,并自动实例化对象
        ApplicationContext context = new ClassPathXmlApplicationContext("classpath:applicationContext.xml");
    }
}
调试:
通过工厂,来实例化对象的方式,用的较少。一般性了解即可。
1.5 从IoC容器中获取Bean
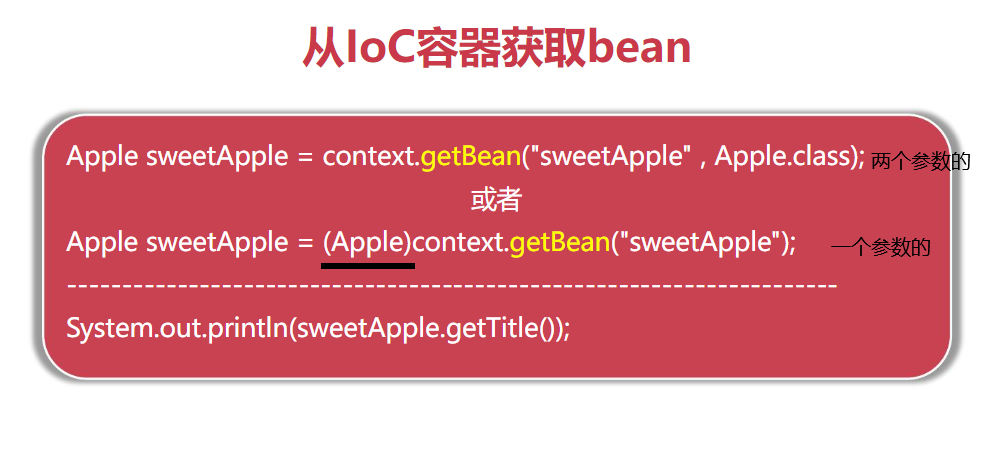
1.使用getBean()方法,从IoC容器获取对应标识的Bean对象
两种写法,推荐上面的写法:
因为更符合现代化的Java应用开发的规范:
编码演示
2.配置中,bean的id属性与name属性的对比
| 对比 | id属性 | name属性 |
|---|---|---|
| 共性1 | 都是唯一标识 | 都是唯一标识 |
| 共性2 | 同一个配置文件中,必须唯一、不能重复 | 同一个配置文件中,必须唯一、不能重复 |
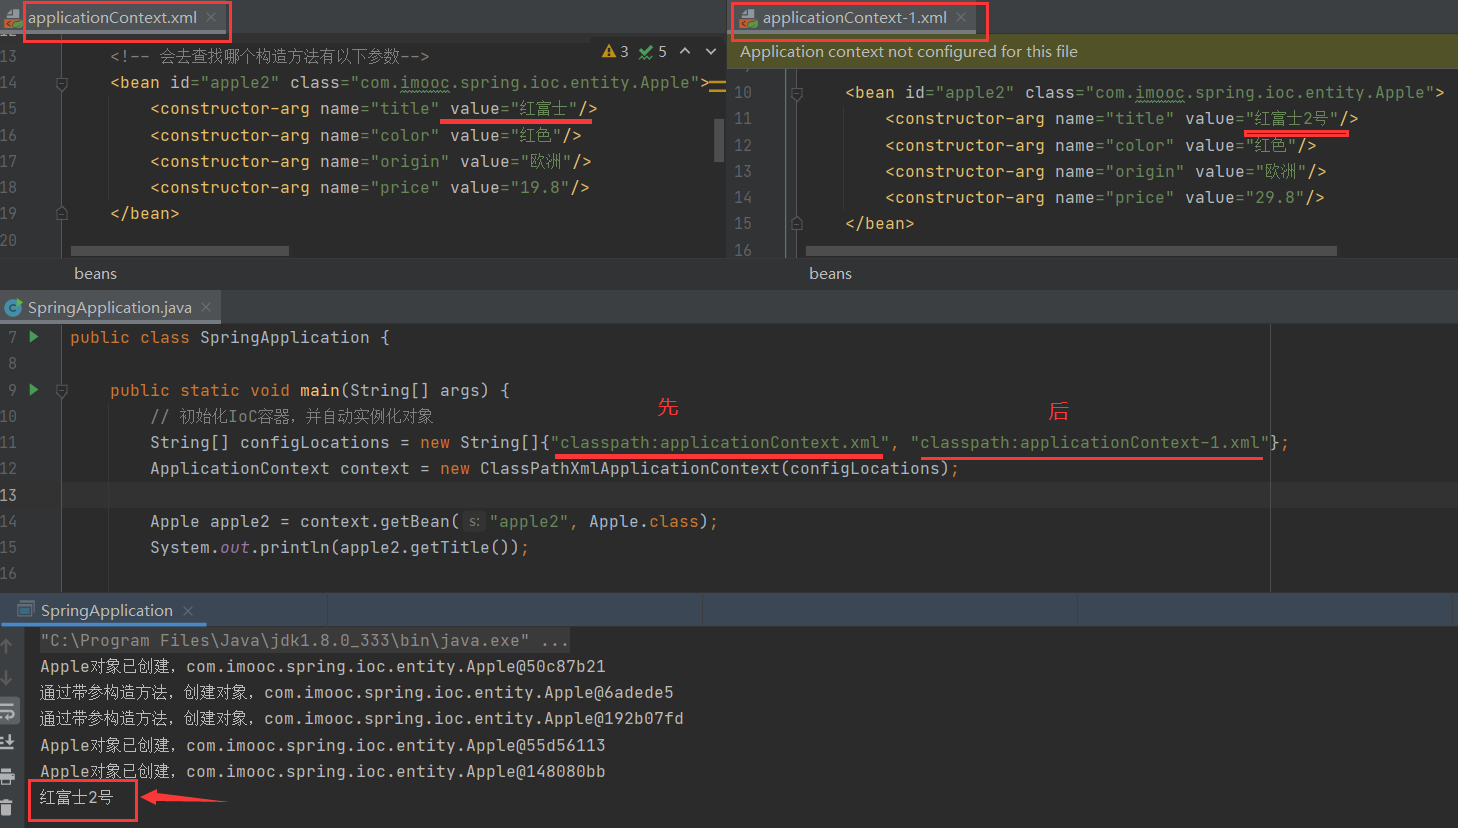
| 共性3 | 多个配置文件中允许重复,但新对象会覆盖旧对象 | 多个配置文件中允许重复,但新对象会覆盖旧对象 |
| 不同 | 一次只能定义一个对象标识 | 一次允许定义多个对象标识 |
| 推荐 |
其中:
- 上述属性的命名,均要有意义,按驼峰命名书写
多个配置文件中允许重复,但新对象会覆盖旧对象:
name属性,一次允许定义多个对象标识;
而id属性一次只能定义一个对象标识
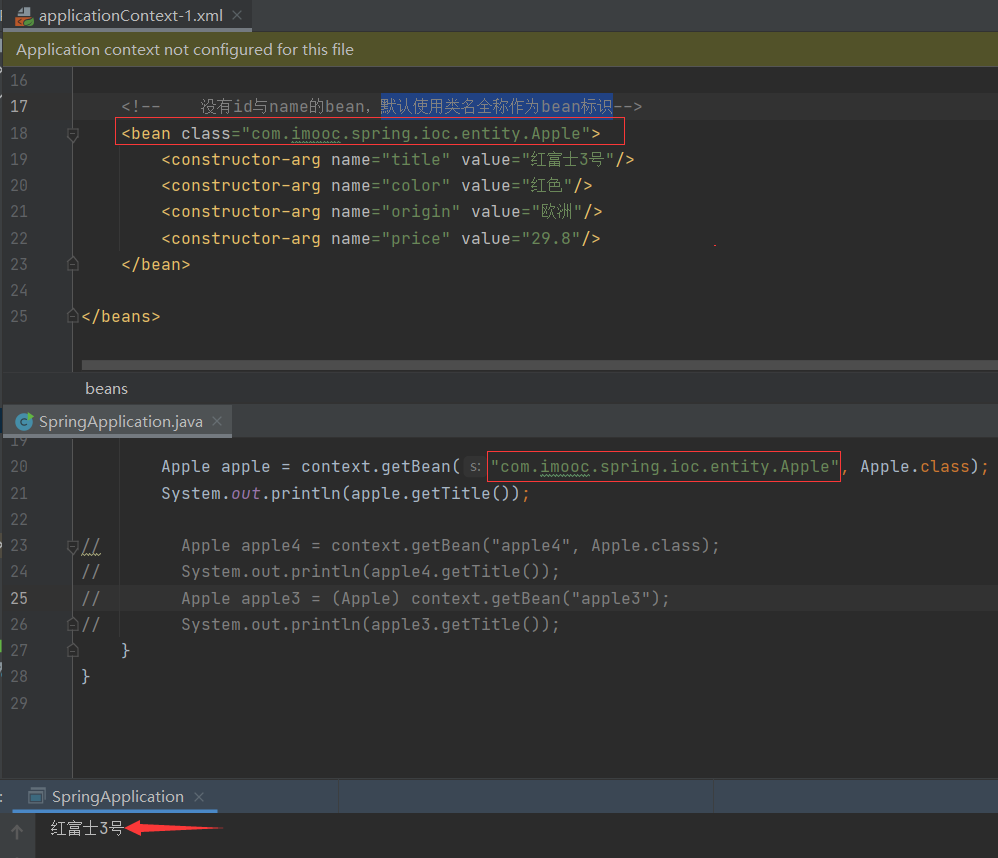
3.Spring,允许一个bean既没有id属性,也没有name属性的。
[少见,一般性了解]
此时,默认使用类名全称来作为bean标识:
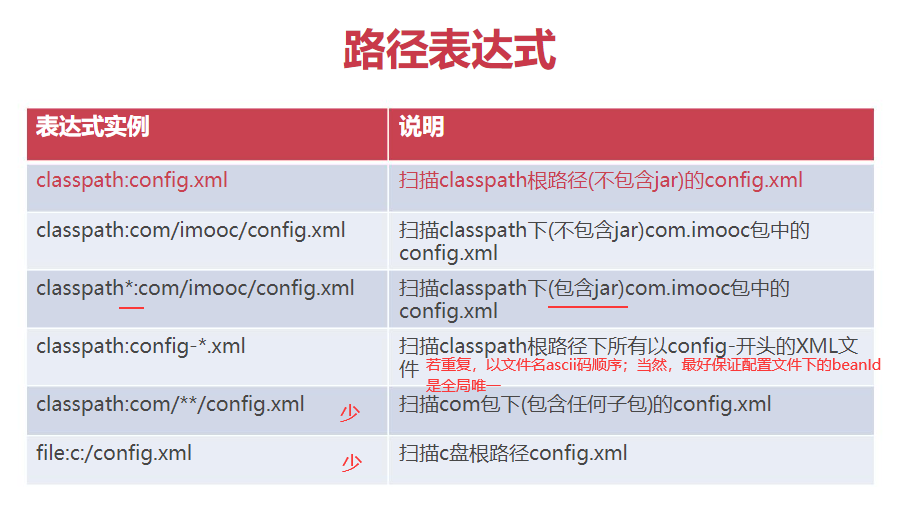
1.6 路径匹配表达式
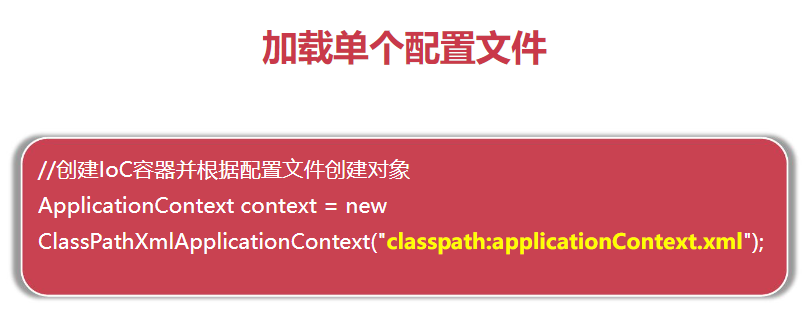
就是在加载配置文件时,传入的特殊格式的字符串。
1.加载单个配置文件
含义:加载当前类路径下的applicationContext.xml文件
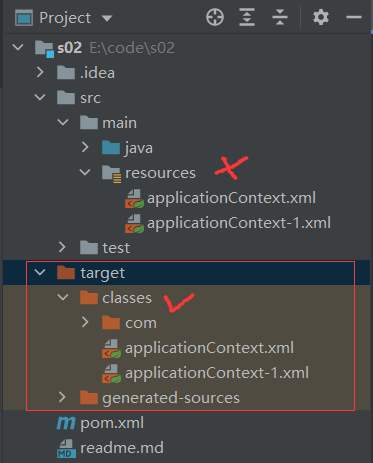
注意:
这个类路径,并不是指编写代码的当前目录,而是真实的运行环境,指的是在黄色的target目录中的classes目录:
所有由源代码编译所产生的自解码文件,也都发布在target目录中。
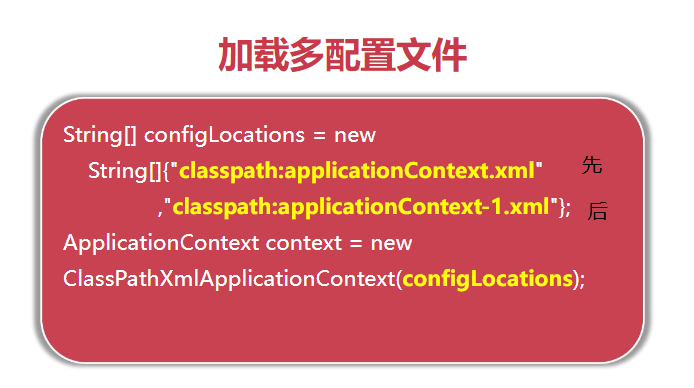
2.加载多个配置文件
使用一个字符串数组来存放
3.除此之外,还有其他的使用形式:
其中:
- 不包含jar:只扫描自己编写的资源,不去扫描jar包中的资源。一般,只扫描自己编写的资源即可
- 包含jar包:都有
二、用依赖注入实现对象间关联
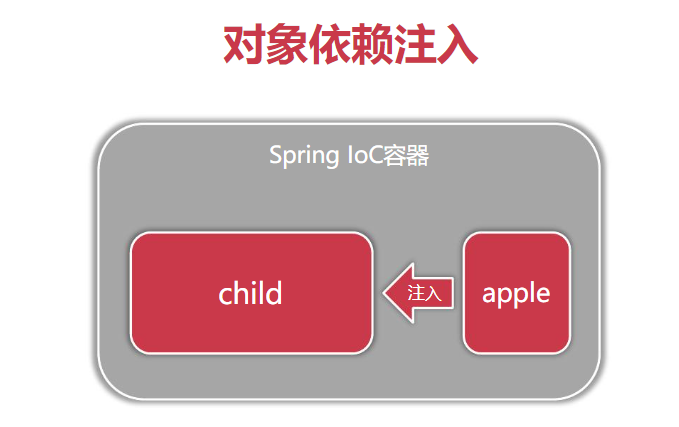
就是说,将两个对象关联起来。
2.1 定义:本质是赋值,be a part;用的property标签
对象的依赖注入:是指利用反射,在运行时,将容器内的对象赋给其他对象。
或者说,将容器内的对象赋给其他对象,作为其他对象的一部分。
在Python中,叫 relation
注入对象的两种方式:
(1)基于 setter 方法注入对象
(2)基于构造方法注入对象
本质:还是属性赋值
上述的对象,既包括静态数值,比如string、float等数据类型,因为它们也都有对应的包装类将其转换为对象,也包括自定义的类对象。
2.2 利用 setter方法注入对象:静态数值
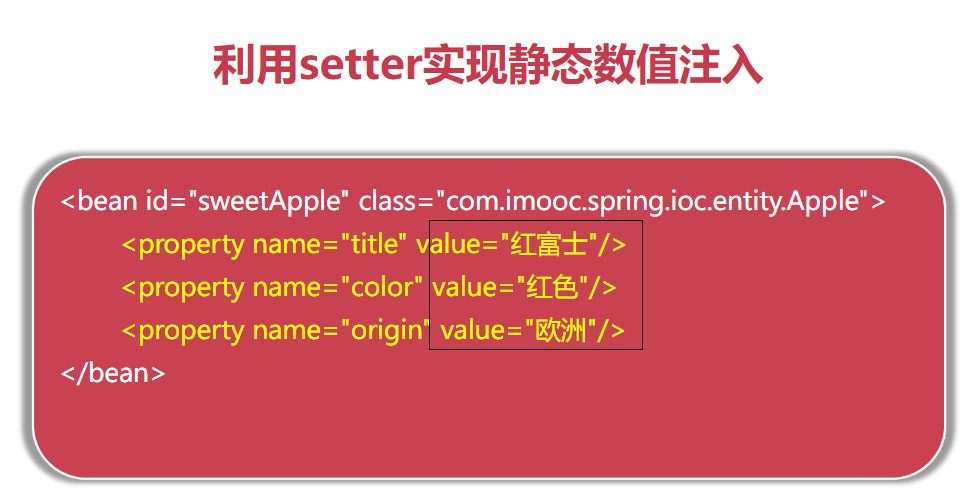
1.语法
value用于设置静态的数值
2.示例
(1)
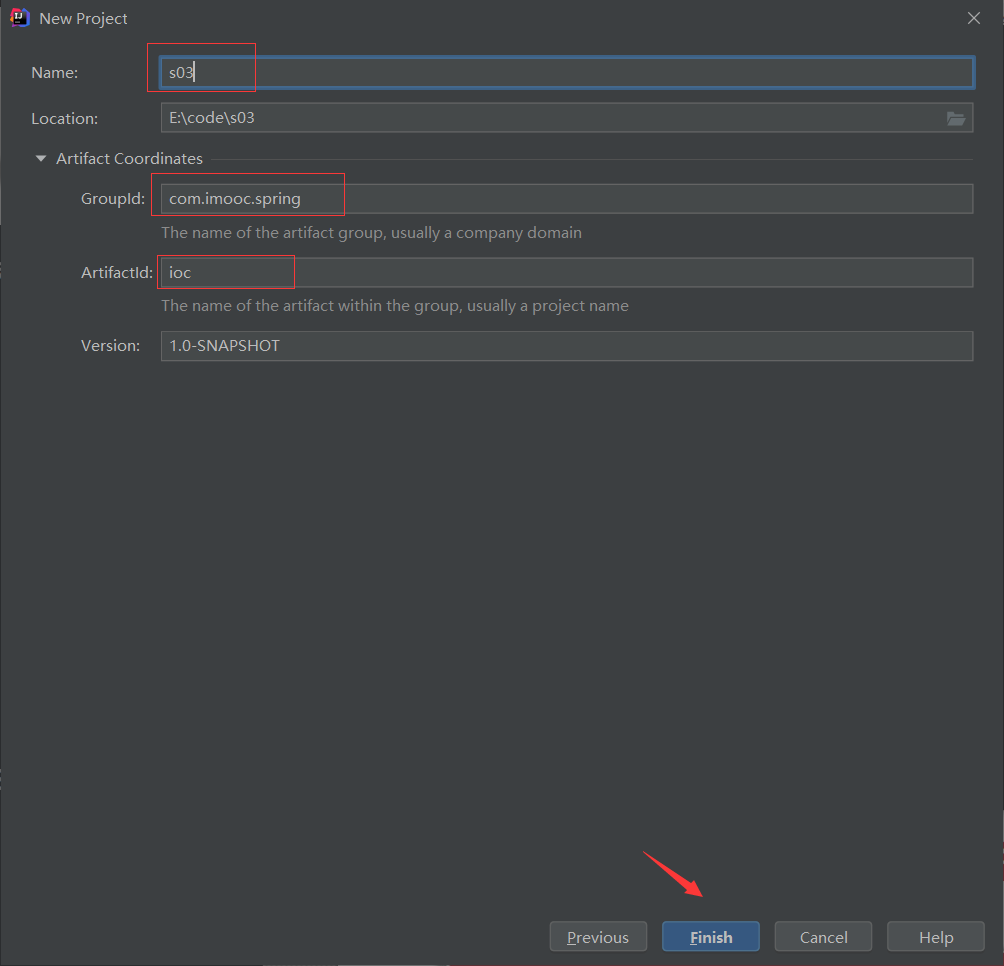
新建Maven工程s03:
新建工程的说明文件readme.md。
讲解注入对象的两种方式:
(1)基于 setter 方法注入对象
(2)基于构造方法注入对象
将以前的s01工程中的两个实体类Apple、Child也直接复制过来,因为是一样的。
接下来,将通过Spring IoC容器,在运行时,为这些属性进行赋值.
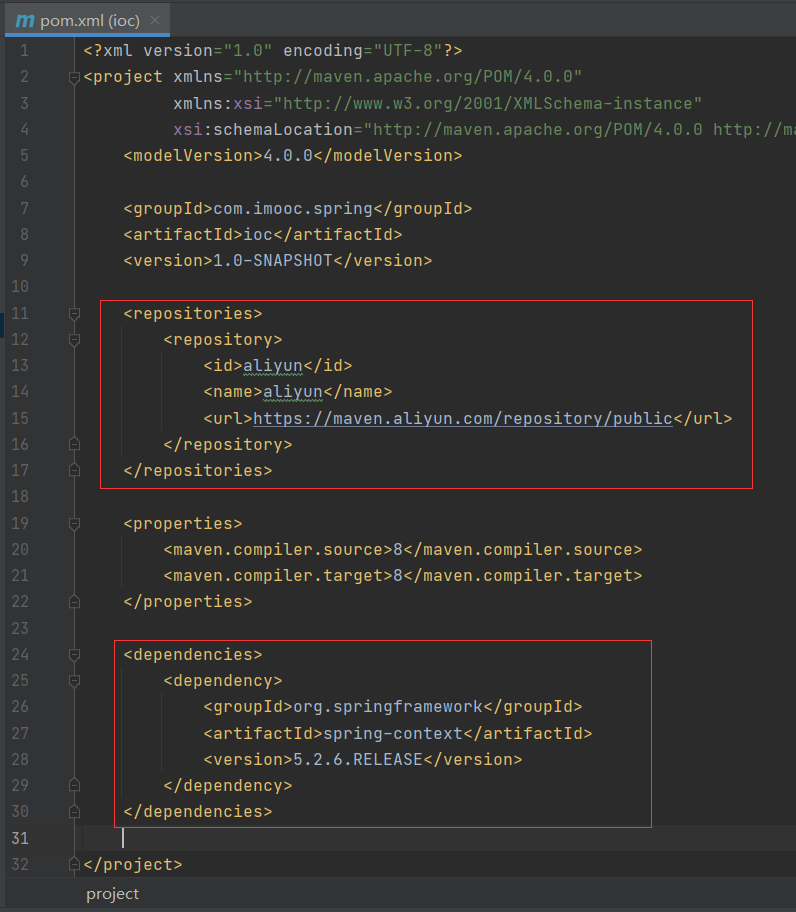
在项目的配置文件pom.xml中引入spring-context依赖:
并手动右上角的加载一下:
在resources目录下,创建 Spring 框架的配置文件applicationContext.xml:
加入官网的格式头,并增加 IDEA的支持:
<?xml version="1.0" encoding="UTF-8"?>
<beans xmlns="http://www.springframework.org/schema/beans"
       xmlns:xsi="http://www.w3.org/2001/XMLSchema-instance"
       xsi:schemaLocation="http://www.springframework.org/schema/beans
        https://www.springframework.org/schema/beans/spring-beans.xsd">


</beans>
(2)
接下来,进行IoC容器的配置:
作为当前的bean,因为包含了Apple实体类中的三个属性,这样在创建实体类对象以后,为这些属性动态设置:
<?xml version="1.0" encoding="UTF-8"?>
<beans xmlns="http://www.springframework.org/schema/beans"
       xmlns:xsi="http://www.w3.org/2001/XMLSchema-instance"
       xsi:schemaLocation="http://www.springframework.org/schema/beans
        https://www.springframework.org/schema/beans/spring-beans.xsd">

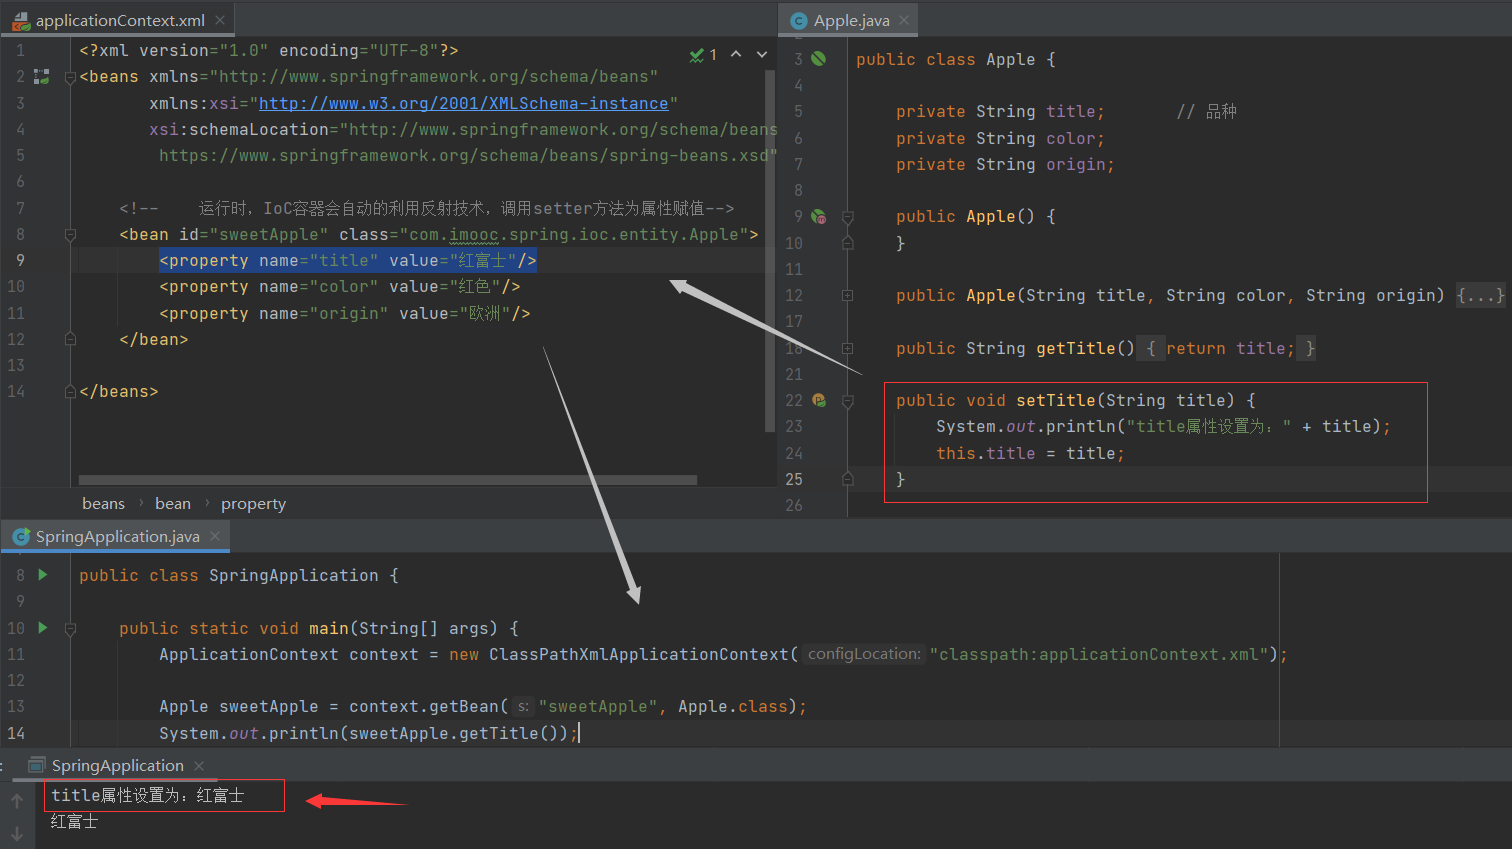
    <!--    运行时,IoC容器会自动的利用反射技术,调用setter方法为属性赋值-->
    <bean id="sweetApple" class="com.imooc.spring.ioc.entity.Apple">
        <property name="title" value="红富士"/>
        <property name="color" value="红色"/>
        <property name="origin" value="欧洲"/>
    </bean>

</beans>在ioc目录下,新建应用程序的入口类SpringApplication.java:
public class SpringApplication {

    public static void main(String[] args) {
        ApplicationContext context = new ClassPathXmlApplicationContext("classpath:applicationContext.xml");

        Apple sweetApple = context.getBean("sweetApple", Apple.class);
        System.out.println(sweetApple.getTitle());
    }
}
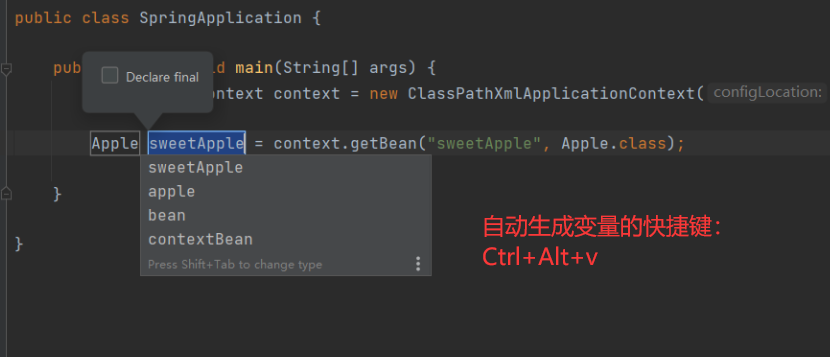
自动生成变量的快捷键:
Ctrl+Alt+v
运行下,结果为:
红富士问题:
我怎么知道,IoC容器是自动调用实体类中的setter方法,来为实体类的对象的属性赋值的呢?
这说明,IoC容器在实例化对象时,发现了配置文件中的<property name="title" value="红富士"/>,
然后,调用实体类中的setTitle()方法,对当前对象的 title属性进行赋值。
这也解释了,为什么能在应用入口类中获得对象sweetApple以后,调用getTitle()方法可以将红富士提取出来。
日常开发中,并不是所有的属性的值都是静态数值。比如Child实体类中有个属性的值是自定义类的实例对象,那么此时该如何进行注入关联呢?
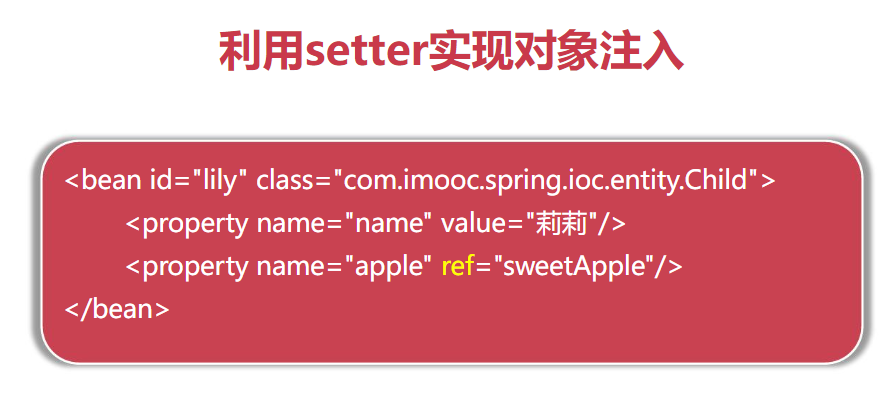
2.3 利用 setter方法注入对象:自定义类的对象(关联动态对象)
1.语法
其中:
ref:reference。引用、关联。用于设置对象
2.示例
在实体类Apple.java中:
public class Apple {

    private String title;       // 品种
    private String color;
    private String origin;

    public Apple() {
        System.out.println("正在创建Apple对象:" + this);
    }

    public Apple(String title, String color, String origin) {
        this.title = title;
        this.color = color;
        this.origin = origin;
    }

    public String getTitle() {
        return title;
    }

    public void setTitle(String title) {
        this.title = title;
    }

    public String getColor() {
        return color;
    }

    public void setColor(String color) {
        this.color = color;
    }

    public String getOrigin() {
        return origin;
    }

    public void setOrigin(String origin) {
        this.origin = origin;
    }
}在实体类Child.java中:
public class Child {

    private String name;
    private Apple apple;        // 该属性的值不是静态数值,而是自定义类的实例对象

    public Child() {
        System.out.println("正在创建Child对象:" + this);
    }

    public Child(String name, Apple apple) {
        this.name = name;
        this.apple = apple;
    }
    public String getName() {
        return name;
    }
    public void setName(String name) {
        this.name = name;
    }
    public Apple getApple() {
        return apple;
    }

    public void setApple(Apple apple) {
        System.out.println("注入的Apple对象:" + apple);
        this.apple = apple;
    }

    public void eat(){
        System.out.println(name + "吃到了" + apple.getOrigin() + "种植的" + apple.getTitle());
    }
}在IoC容器的核心配置文件applicationContext.xml中:
<?xml version="1.0" encoding="UTF-8"?>
<beans ...>

    <!--    运行时,IoC容器会自动的利用反射技术,调用setter方法为属性赋值-->
    <bean id="sweetApple" class="com.imooc.spring.ioc.entity.Apple">
        <property name="title" value="红富士"/>
        <property name="color" value="红色"/>
        <property name="origin" value="欧洲"/>        <!--利用value注入依赖的静态数值-->
    </bean>

     <!--    运行时,IoC容器会自动的利用反射技术,调用setter方法为属性赋值-->
    <bean id="lily" class="com.imooc.spring.ioc.entity.Child">
        <property name="name" value="莉莉"/>
        <property name="apple" ref="sweetApple"/>      <!--利用ref注入依赖的自定义类的对象-->
    </bean>

</beans>在应用入口类SpringApplication.java中:
public class SpringApplication {

    public static void main(String[] args) {
        ApplicationContext context = new ClassPathXmlApplicationContext("classpath:applicationContext.xml");

        Apple sweetApple = context.getBean("sweetApple", Apple.class);
    }
}
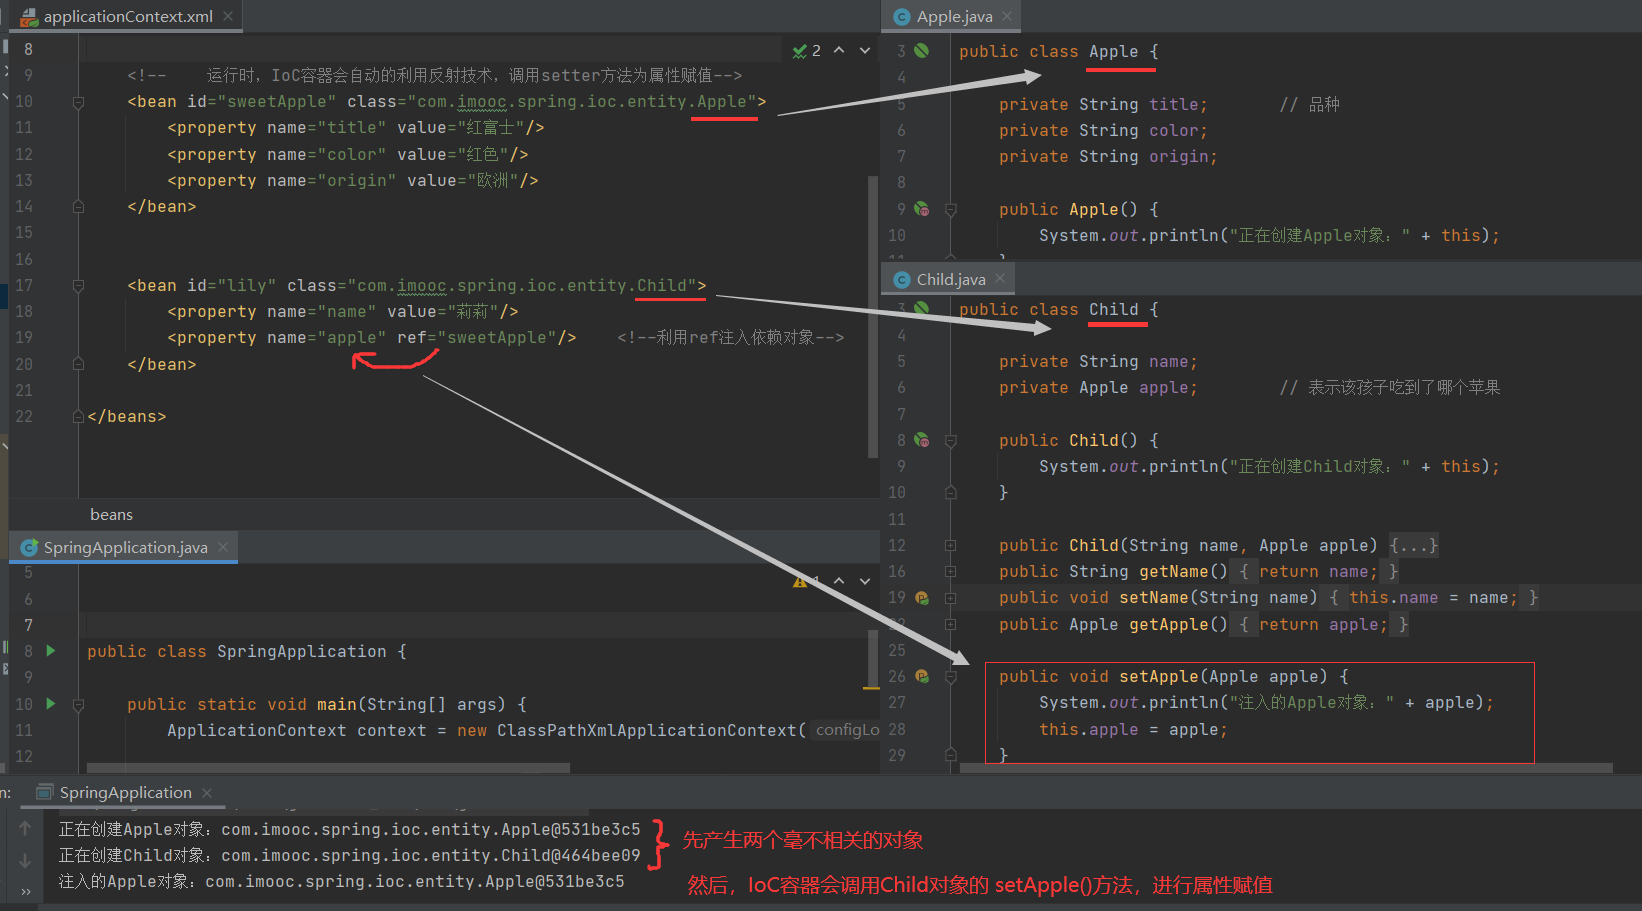
结果为:
正在创建Apple对象:com.imooc.spring.ioc.entity.Apple@531be3c5
正在创建Child对象:com.imooc.spring.ioc.entity.Child@464bee09

注入的Apple对象:com.imooc.spring.ioc.entity.Apple@531be3c5        // 注入的自定义类的对象,正是上面实例化的对象
整体图示:
恍然大悟!
不用Spring时,以前的传统的初始化对象不也两种吗:(见4.2节)
(1)利用多参构造方法:
Apple apple1 = new Apple("红富士", "红色", "欧洲");(2)利用无参构造方法,同时调用setter方法为实例化的对象属性赋值:
- 赋的是静态数值
 Apple apple1 = new Apple();
 apple1.setTitle("红富士");
 apple1.setColor("红色");
 apple1.setOrigin("欧洲");
- 赋的是自定义的类的对象
Child lily = new Child();
lily.setName("莉莉");
lily.setApple(apple1);
所以,本节的依赖注入,底层思想仍是上述的(2)。只不过Spring 做了封装而已。
为了达到相同的功能,换了个方式。
2.4 案例:书店的数据库升级
演示如何通过IoC容器,将软件中的对象解耦,进而让软件团队成员协作之间,也解耦。
1.前期准备
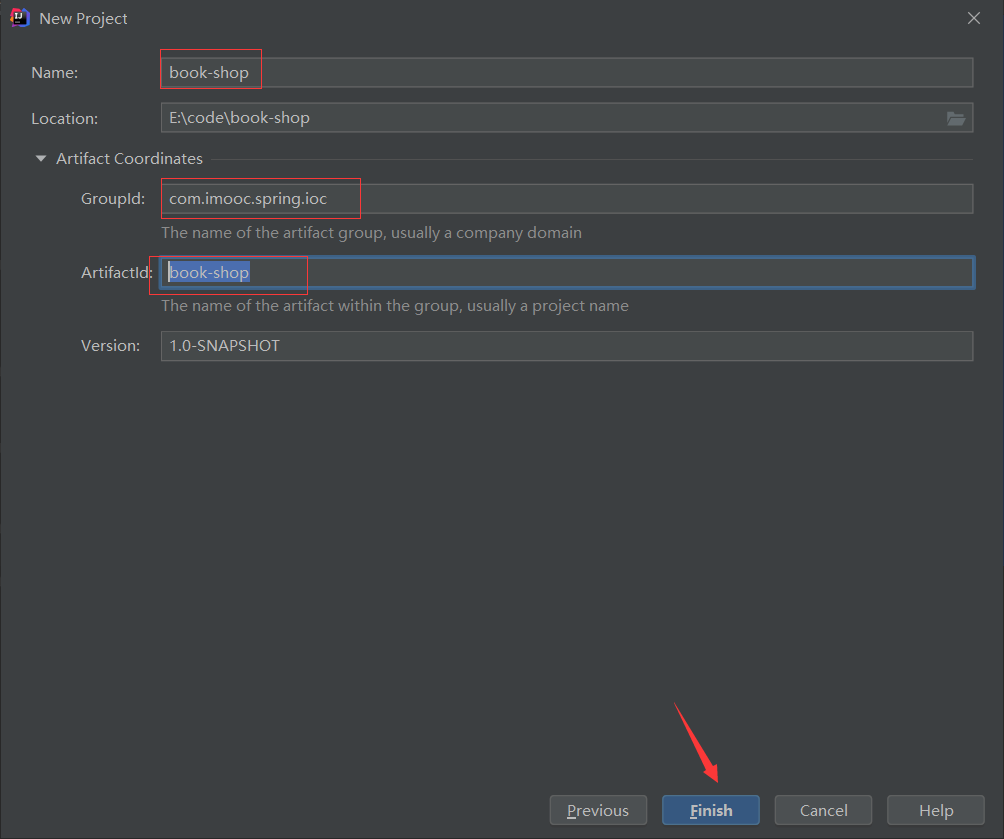
新建Maven工程book-shop:
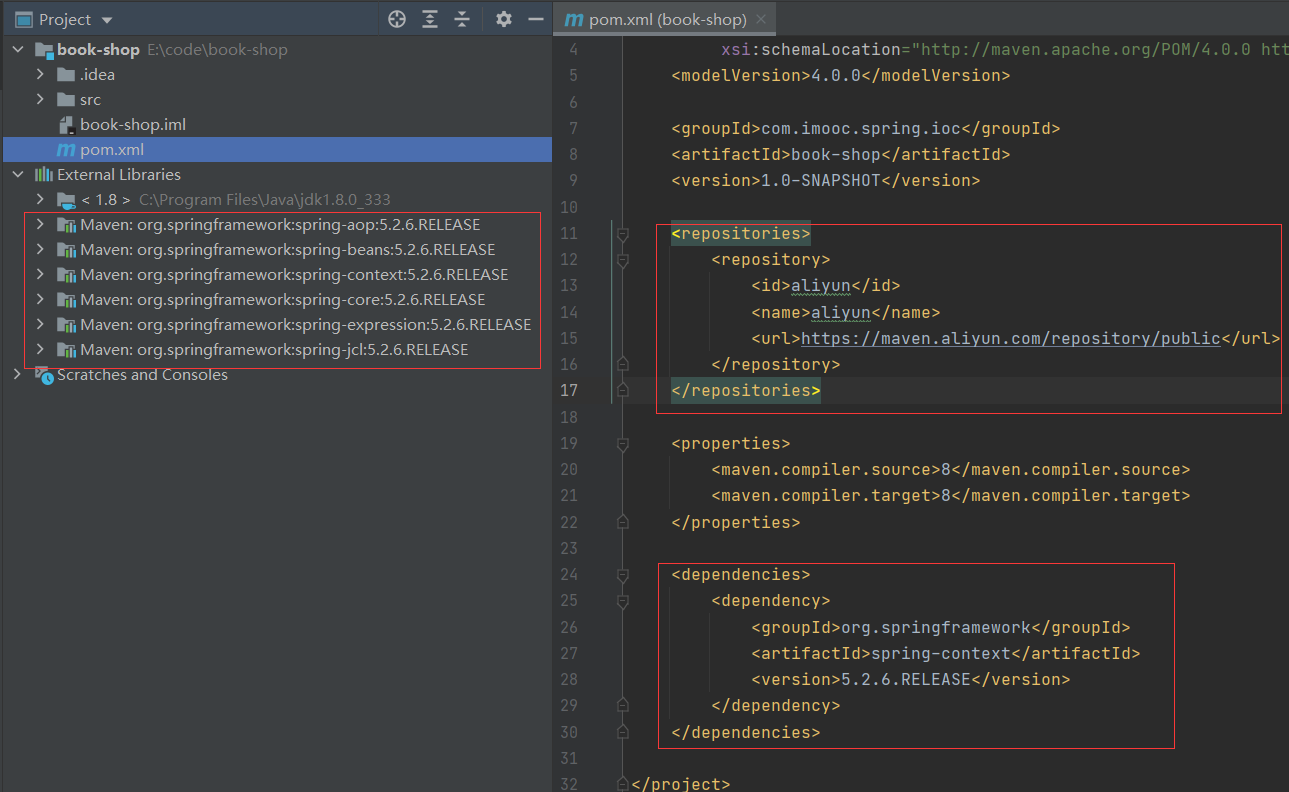
引入依赖:
2.
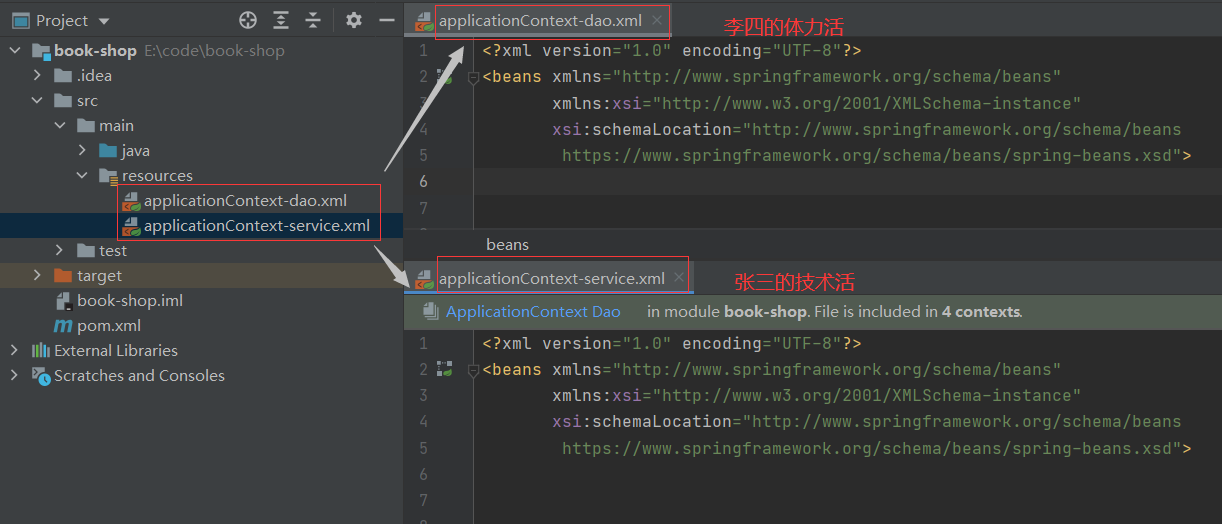
在目录中,新建两个不同的配置文件:
applicationContext-service.xml------- 用于保存所有的服务类(编码快、技术好的人:张三)applicationContext-dao.xml-------------用于保存所有的数据访问类,用于数据库的增删改查操作(体力活,没技术含量的人:李四)
原因:
处于项目管理的考量,比如团队中不同成员的技术好坏,应该各司其职、减少工作交叉。
即,模拟两个人在维护各自的文件。
加入官网的格式头,并增加IDEA的支持。
3.
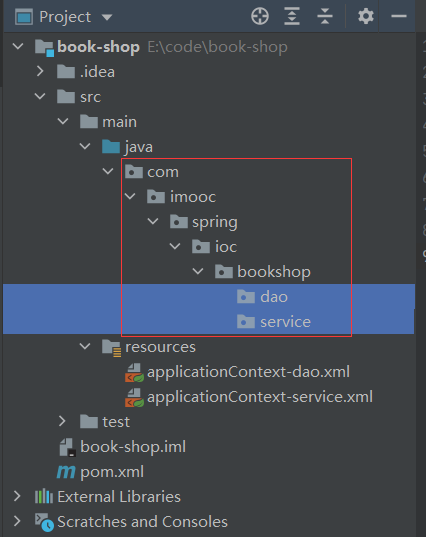
在java目录下,增加新包com.imooc.spring.ioc.bookshop.dao,同时创建平级的service包:
新建接口BookDao:
public interface BookDao {
    public void insert();       // 表示向数据库的Book表中,新插入一条数据
}有接口,就要有实现类BookDaoImpl(也就是实体类):
public class BookDaoImpl implements BookDao {

    @Override
    public void insert() {
        System.out.println("向MySQL Book表插入一条数据");
    }
}
疑惑:直接跟service层一样,直接编写个实体类不就行?为啥还要多此一举,加个接口呢?
答:基于Java的多态性,接口能根据对象的类型,自动装配。
后续可知最终目的:是为了解耦,李四代码变了,张三可以啥都不变 :)
新建实体类BookService:
public class BookService {

    private BookDao bookDao;        // 属性是一个接口,可视为自定义的类的对象

    public BookDao getBookDao() {
        return bookDao;
    }

    public void setBookDao(BookDao bookDao) {
        this.bookDao = bookDao;
    }

    public void purchase(){                                  // 购买的实例方法
        System.out.println("正在执行图书采购业务方法");
        bookDao.insert();
    }
}
4.
关键的地方来了:service、dao写好后,如何让IoC容器对其进行管理呢?
在两个配置文件中分别配置:
在体力活李四负责applicationContext-dao.xml中:
<?xml version="1.0" encoding="UTF-8"?>
<beans ..>

    <bean id="bookDao" class="com.imooc.spring.ioc.bookshop.dao.BookDaoImpl">    // 实体类,实现类为BookDaoImpl

    </bean>

</beans>在技术活张三负责的applicationContext-service.xml中:
<?xml version="1.0" encoding="UTF-8"?>
<beans ..>

    <bean id="bookService" class="com.imooc.spring.ioc.bookshop.service.BookService">   // 实体类
        <property name="bookDao" ref="bookDao"/>             // 这里引用的是上面名为bookDao的bean对象
    </bean> // 上面这个属性名是bookDao,类型是BookDao接口

</beans>
问题:上面的bookDao对象,是从哪里来的?
答:是从Spring的IoC容器中取出的。
当程序启动时,会根据applicationContext-dao.xml中的配置,自动创建名为bookDao的bean。当创建名为bookService的bean时,就可以引用依赖名为bookDao的bean了。
这样,整体的XML和对象的配置,已经完成。
5.
新建应用入口类BookShopApplication.java:
public class BookShopApplication {

    public static void main(String[] args) {
        // 基于XML,来初始化IoC容器         // 这里的路径匹配表达式,用的正是上节刚学的通配符,来指向两个配置文件
        ApplicationContext context = new ClassPathXmlApplicationContext("classpath:applicationContext-*.xml");

        BookService bookService = context.getBean("bookService", BookService.class);
        bookService.purchase();
    }
}
结果为:
成功显示。且实现了通过配置的方式,张三的service调用了李四的dao的过程,各做各的、互不干扰。
正在执行图书采购业务方法
向MySQL Book表插入一条数据
6.这些写有很大的好处、便利:
比如,书店要进行系统升级,要将MySQL数据库替换为Oracle数据库。
因为两个数据库的底层语法,是太不一样的,所以Dao类不能重用,李四只需要针对Oracle数据库,重新编写实现类即可:
重新编写实现类BookDaoOracleImpl:
public class BookDaoOracleImpl implements BookDao {

    @Override
    public void insert() {
        System.out.println("向Oracle Book表插入一条数据");
    }
}
然后,程序产生的唯一变化是:
还是在李四维护的applicationContext-dao.xml中,将旧的实现类改为上述新的实现类BookDaoOracleImpl即可:
<?xml version="1.0" encoding="UTF-8"?>
<beans ..>
                                             // 这里小变,调用上述新的实现类BookDaoOracleImpl
    <bean id="bookDao" class="com.imooc.spring.ioc.bookshop.dao.BookDaoOracleImpl">

    </bean>

</beans>
上述两个调正,全是李四做的。
而对于张三,配置文件中不用做任何调整,甚至张三就不需要知道后台进行了数据库的升级。因为两人约定的bean 的id号没有发生变化。
在技术活张三负责的applicationContext-service.xml中:啥都不用变
<?xml version="1.0" encoding="UTF-8"?>
<beans ..>

    <bean id="bookService" class="com.imooc.spring.ioc.bookshop.service.BookService">   // 实体类
        <property name="bookDao" ref="bookDao"/>             // 这里引用的是上面名为bookDao的bean对象
    </bean> // 上面这个属性名是bookDao,类型是BookDao接口

</beans>又因为,剥离出了BookDao接口,无论是MySQL实现类,还是Oracle实现类,都实现了相同的接口。
所以,IoC容器注入依赖对象时,并不会因实现类的变化而出错。
接口的多态性,接口会自动识别不同的实现类。
就像孙悟空72变一样,接口可以变为或指向任何它的实现类。
结果为:
正在执行图书采购业务方法
向Oracle Book表插入一条数据
综上所述,是利用IoC控制反转容器,实现对象间的解耦。进一步,工作方式也发生了变化:由原先多人协商、开会才能解决的事情,现在只需要两人约定一个bean,只要调用这个bean,功能就能实现。这对于大型软件,至关重要,非常节约时间成本。
2.5 利用构造方法注入对象:动态引用的对象
跟之前5.4节基于构造方法,实现实例化对象很像。
只不过,传入的信息由静态数值,变为动态引用的对象。
只需要知道,构造方法中,如果某个参数是一个自定义的类的对象,可以使用 ref 让 IoC容器在运行时,通过反射进行动态的注入。
用s03工程进行演示。
1.编码
在实例化对象的同时,来动态注入Apple对象:
在实体类Child中:
public class Child {

    private String name;
    private Apple apple;

    public Child() {
        System.out.println("正在创建Child对象:" + this);
    }

    public Child(String name, Apple apple) {    // 构造方法中,如果某个参数是一个自定义的类对象
        System.out.println("构造方法参数apple:" + apple);
        this.name = name;
        this.apple = apple;
    }

    public String getName() {
        return name;
    }

    public void setName(String name) {
        this.name = name;
    }

    public Apple getApple() {
        return apple;
    }

    public void setApple(Apple apple) {
        System.out.println("注入的Apple对象:" + apple);
        this.apple = apple;
    }

    public void eat(){
        System.out.println(name + "吃到了" + apple.getOrigin() + "种植的" + apple.getTitle());
    }
}在applicationContext.xml中:
<?xml version="1.0" encoding="UTF-8"?>
<beans ...>

    <!--    创建一个酸的苹果对象-->
    <bean id="sourApple" class="com.imooc.spring.ioc.entity.Apple">
        <property name="title" value="青苹果"/>
        <property name="color" value="绿色"/>
        <property name="origin" value="中亚"/>
    </bean>


    <!--    通过constructor-ar标签,在实例化对象的同时,利用构造方法来动态注入Apple对象-->
    <bean id="andy" class="com.imooc.spring.ioc.entity.Child">
        <constructor-arg name="name" value="安迪"/>
        <constructor-arg name="apple" ref="sourApple"/>   // 用ref,来关联动态引用的对象
    </bean>

</beans>在应用入口类SpringApplication.java中:
public class SpringApplication {

    public static void main(String[] args) {
        ApplicationContext context = new ClassPathXmlApplicationContext("classpath:applicationContext.xml");

        Child andy = context.getBean("andy", Child.class);
        andy.eat();
    }
}
结果为:
正在创建Apple对象:com.imooc.spring.ioc.entity.Apple@59ec2012
构造方法参数apple:com.imooc.spring.ioc.entity.Apple@59ec2012

安迪吃到了中亚种植的青苹果
三、依赖注入包含多数据的集合对象
上面对象的依赖注入,只是单个对象。但是,在平时的项目开发中,会遇到比如 list、set、map这样的集合。这种包含多数据的集合对象,IoC容器能否对其进行注入呢?
| 集合种类 | list | set | map | properties |
|---|---|---|---|---|
| 特点 | 允许元素重复 | 元素不能重复, 自动去重 | 键值对 | 键值对,但只允许是字符串类型, 不能在value部分动态引用其他对象 |
| 很多公司会将其作为配置文件,保存比如数据库连接字符串、用户名密码等静态文本数据 |
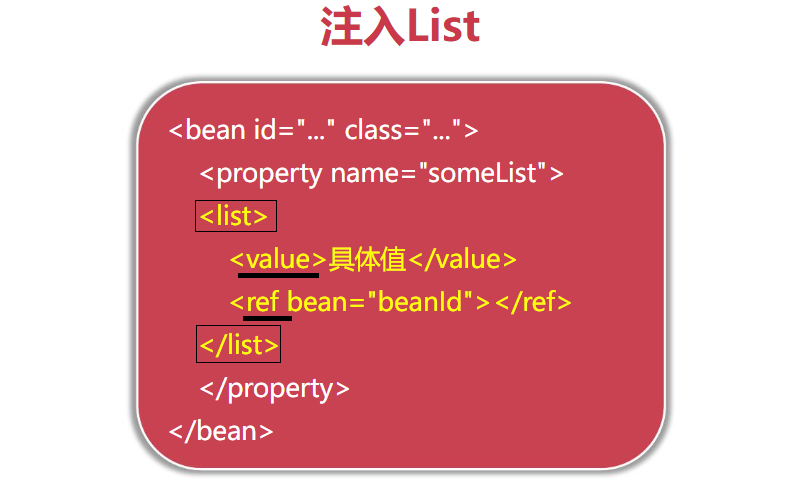
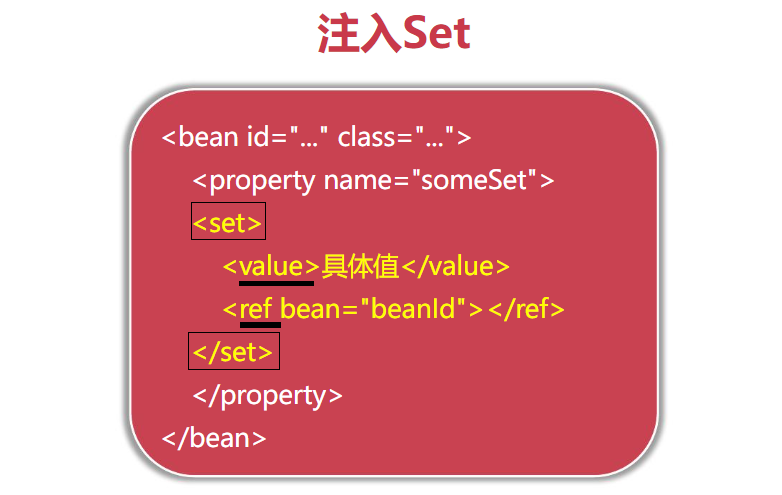
- 前三种,既可以注入静态数值,也可以注入动态引用对象
3.1 语法:注入的四类集合对象
1.注入list
2.注入set
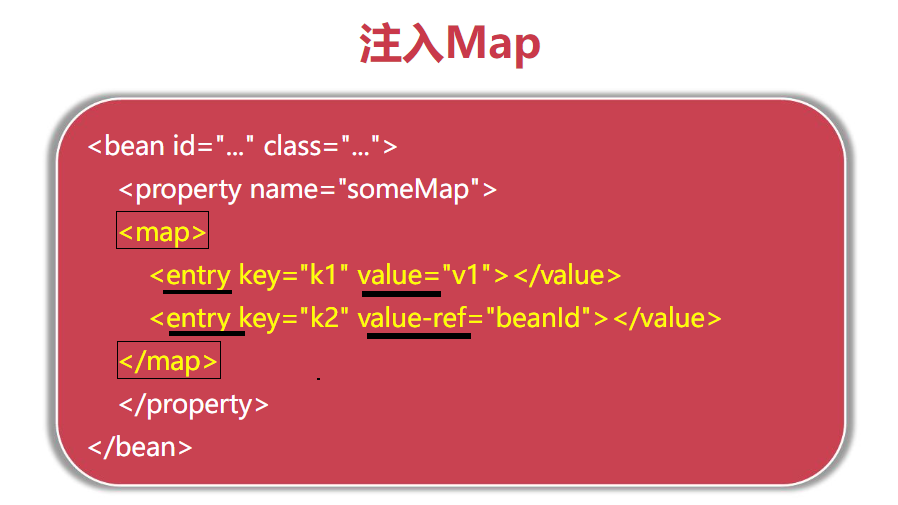
3.注入map
一个entry标签,表示一个键值对:
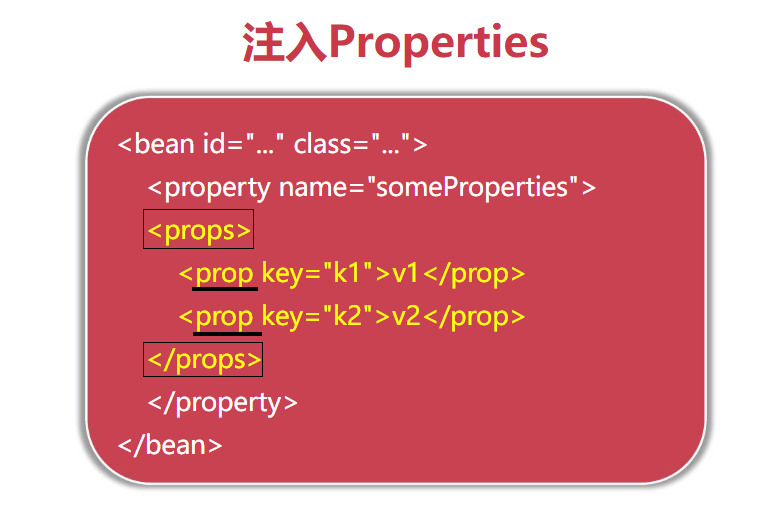
4.注入properties
一个prop标签,表示一个键值对:
3.2 案例:公司资产配置清单
1.搭建项目的基础架构
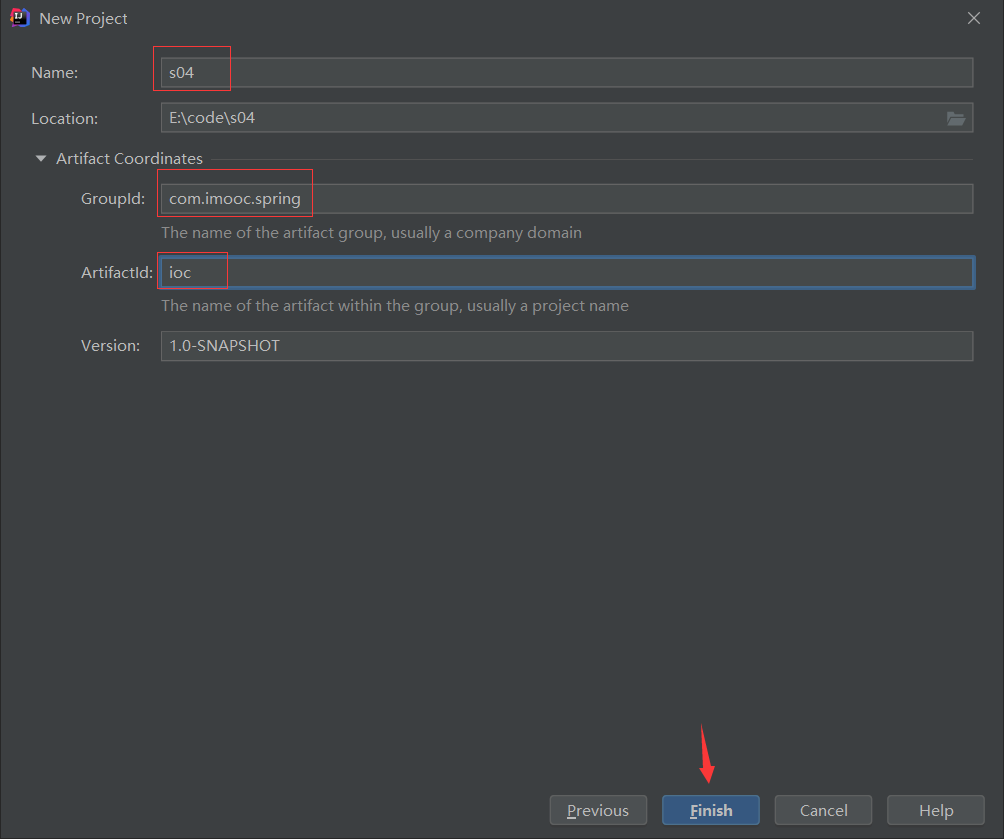
新建s04工程:
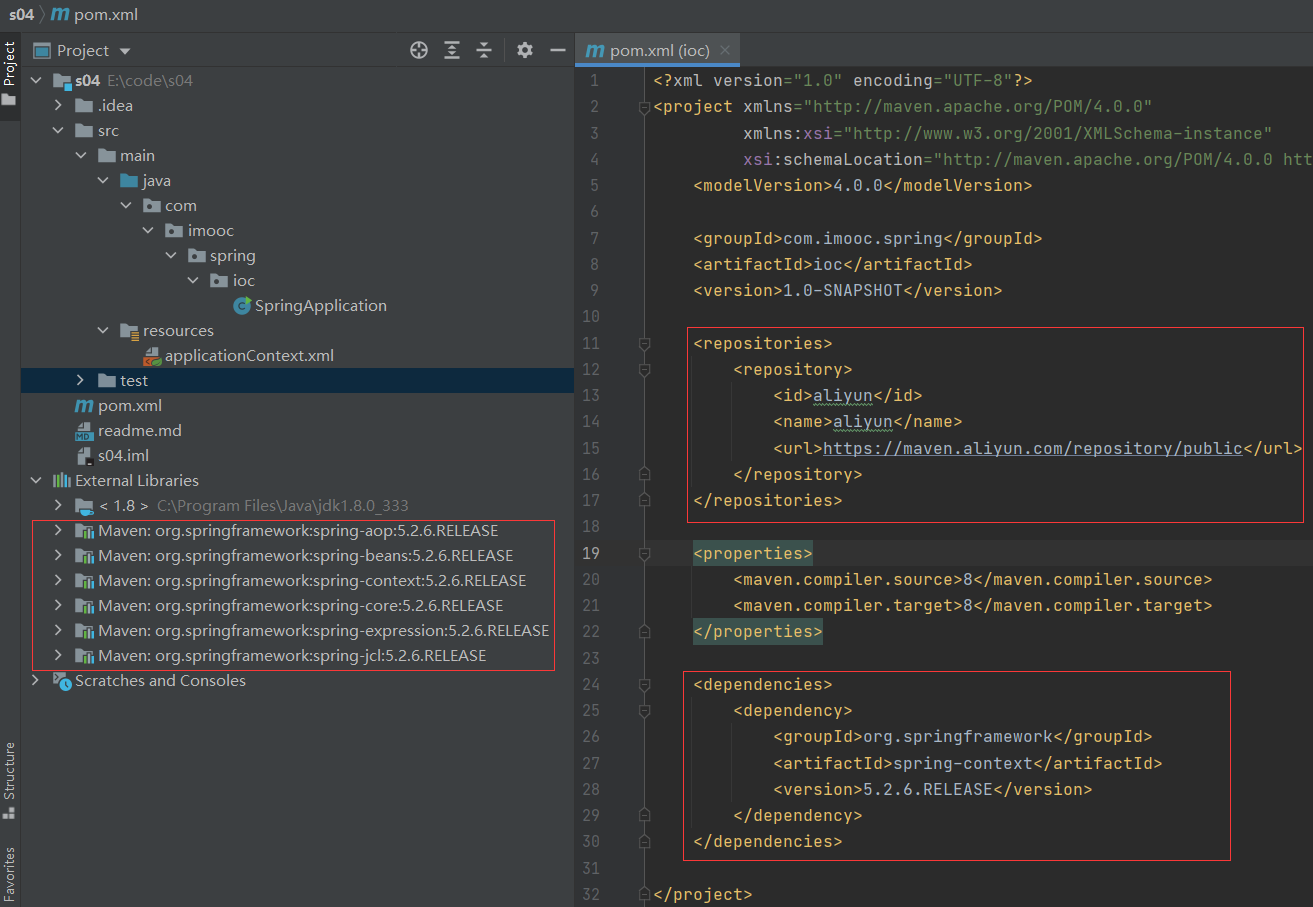
在工程的根路径下,新建工程的说明文件readme.md:
通过“公司资产配置清单”案例,来学习各种集合类型的动态注入在工程的配置文件pom.xml中,引入spring-context依赖,并右上角加载:
创建Spring IoC 容器的配置文件applicationContext.xml的基础结构:
<?xml version="1.0" encoding="UTF-8"?>
<beans xmlns="http://www.springframework.org/schema/beans"
       xmlns:xsi="http://www.w3.org/2001/XMLSchema-instance"
       xsi:schemaLocation="http://www.springframework.org/schema/beans
        https://www.springframework.org/schema/beans/spring-beans.xsd">


</beans>创建应用入口类SpringApplication.java的基础结构:
public class SpringApplication {

    public static void main(String[] args) {
        // ioC容器的初始化工作
        ApplicationContext context = new ClassPathXmlApplicationContext("classpath:applicationContext.xml");

    }
}
下面,将加入自己的代码。
2.创建两个实体类:
公司实体类Company.java:
公司实体类没有构造方法?默认无参构造。
import java.util.List;
import java.util.Map;
import java.util.Properties;


public class Company {
    // 公司实体类包含了若干资产,根据资产的类型不同,采用不同的数据结构进行存储
    private List<String> rooms;
    private Map<String, Computer> computers;
    private Properties info;                      // 其键值对必须都是String类型


    public List<String> getRooms() {
        return rooms;
    }

    public void setRooms(List<String> rooms) {
        this.rooms = rooms;
    }

    public Map<String, Computer> getComputers() {
        return computers;
    }

    public void setComputers(Map<String, Computer> computers) {
        this.computers = computers;
    }

    public Properties getInfo() {
        return info;
    }

    public void setInfo(Properties info) {
        this.info = info;
    }

    @Override
    public String toString() {
        return "Company{" +
                "rooms=" + rooms +
                ", computers=" + computers +
                ", info=" + info +
                '}';
    }
}计算机实体类Computer.java
计算机是作为公司资产的一部分。
public class Computer {

    private String brand;       // 品牌
    private String type;        // 类型:台式机、笔记本、服务器
    private String sn;          // 采购时的产品序列号
    private Float price;

    public Computer() {
    }

    public Computer(String brand, String type, String sn, Float price) {
        this.brand = brand;
        this.type = type;
        this.sn = sn;
        this.price = price;
    }

    public String getBrand() {
        return brand;
    }

    public void setBrand(String brand) {
        this.brand = brand;
    }

    public String getType() {
        return type;
    }

    public void setType(String type) {
        this.type = type;
    }

    public String getSn() {
        return sn;
    }

    public void setSn(String sn) {
        this.sn = sn;
    }

    public Float getPrice() {
        return price;
    }

    public void setPrice(Float price) {
        this.price = price;
    }

    @Override
    public String toString() {
        return "Company{" +
                "brand='" + brand + '\'' +
                ", type='" + type + '\'' +
                ", sn='" + sn + '\'' +
                ", price=" + price +
                '}';
    }
}
3.如何在IoC容器创建后,自动的实例化 Company对象,并填充其属性信息呢?
所有工作都是在配置文件applicationContext.xml中完成:
<?xml version="1.0" encoding="UTF-8"?>
<beans ...>

    <bean id="company" class="com.imooc.spring.ioc.entity.Company">
        <property name="rooms">
            <list>                                // list类型,里面包含了3个静态数值
                <value>2001-总裁办</value>
                <value>2003-总经理办公室</value>
                <value>2010-研发部会议室</value>
            </list>
        </property>
    </bean>

</beans>在应用入口类SpringApplication.java中:
public class SpringApplication {

    public static void main(String[] args) {
        // ioC容器的初始化工作
        ApplicationContext context = new ClassPathXmlApplicationContext("classpath:applicationContext.xml");

        Company company = context.getBean("company", Company.class);
        System.out.println(company);
    }
}
结果为:
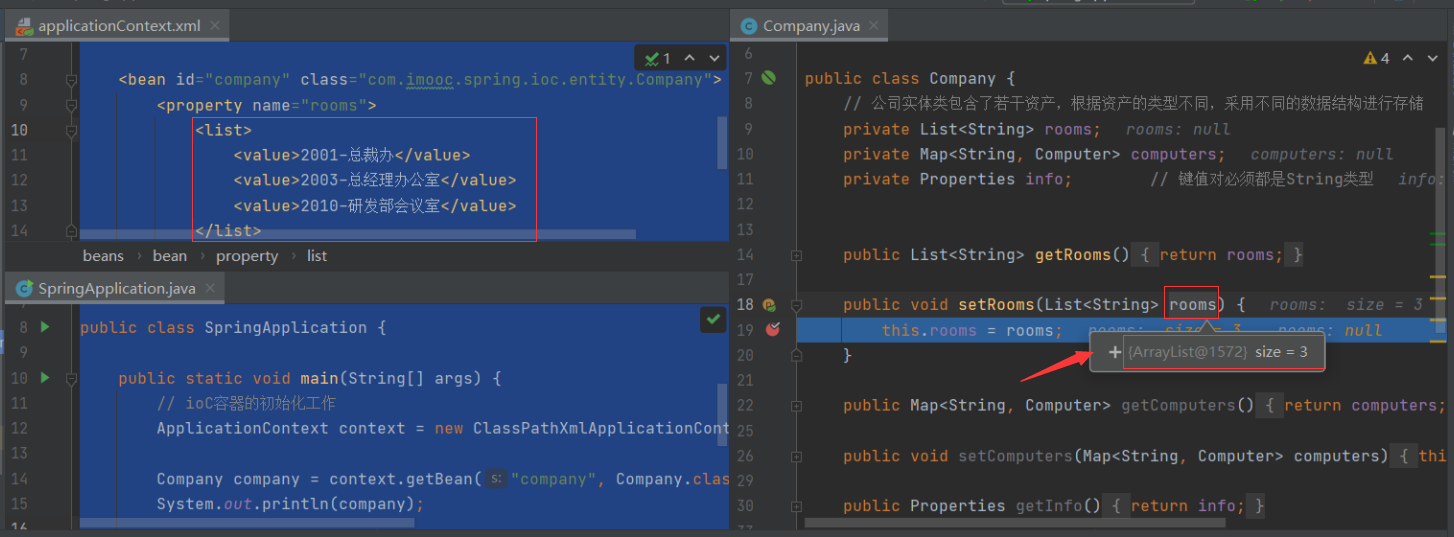
Company{rooms=[2001-总裁办, 2003-总经理办公室, 2010-研发部会议室], computers=null, info=null}调试发现:
applicationContext,利用 list 标签生成的是一个 ArrayList 对象:
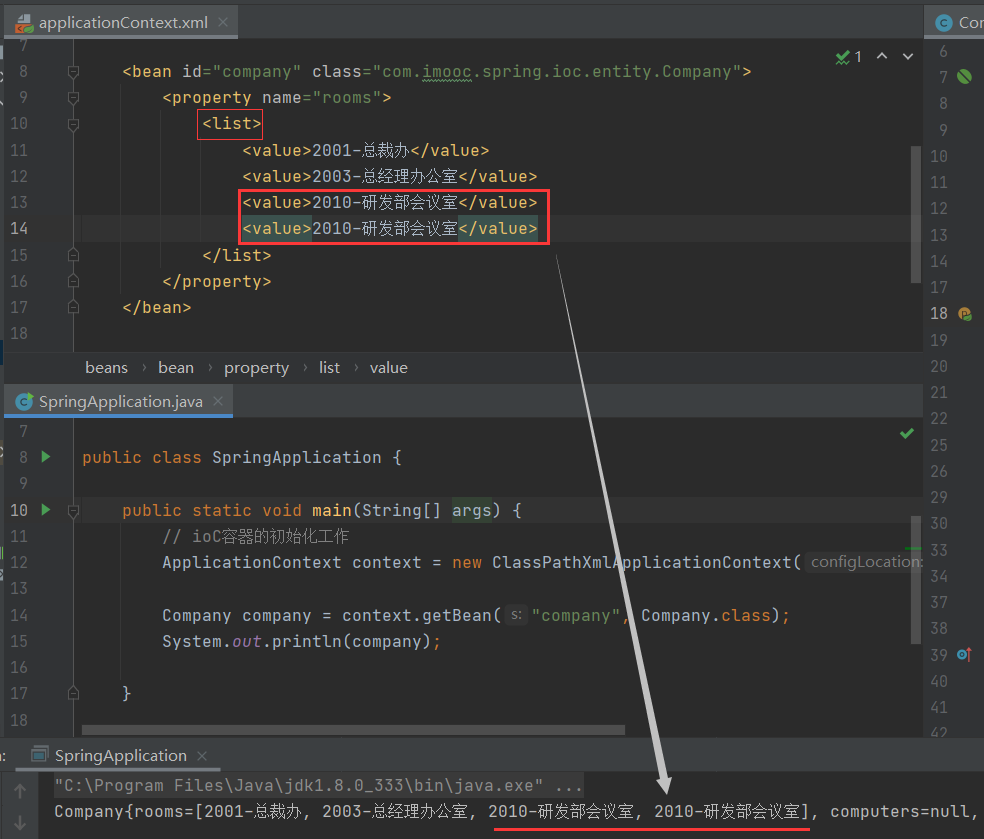
4.
List 数据结构类型有个缺点:允许元素重复。
这不符合实际情况,那么如何去重呢?
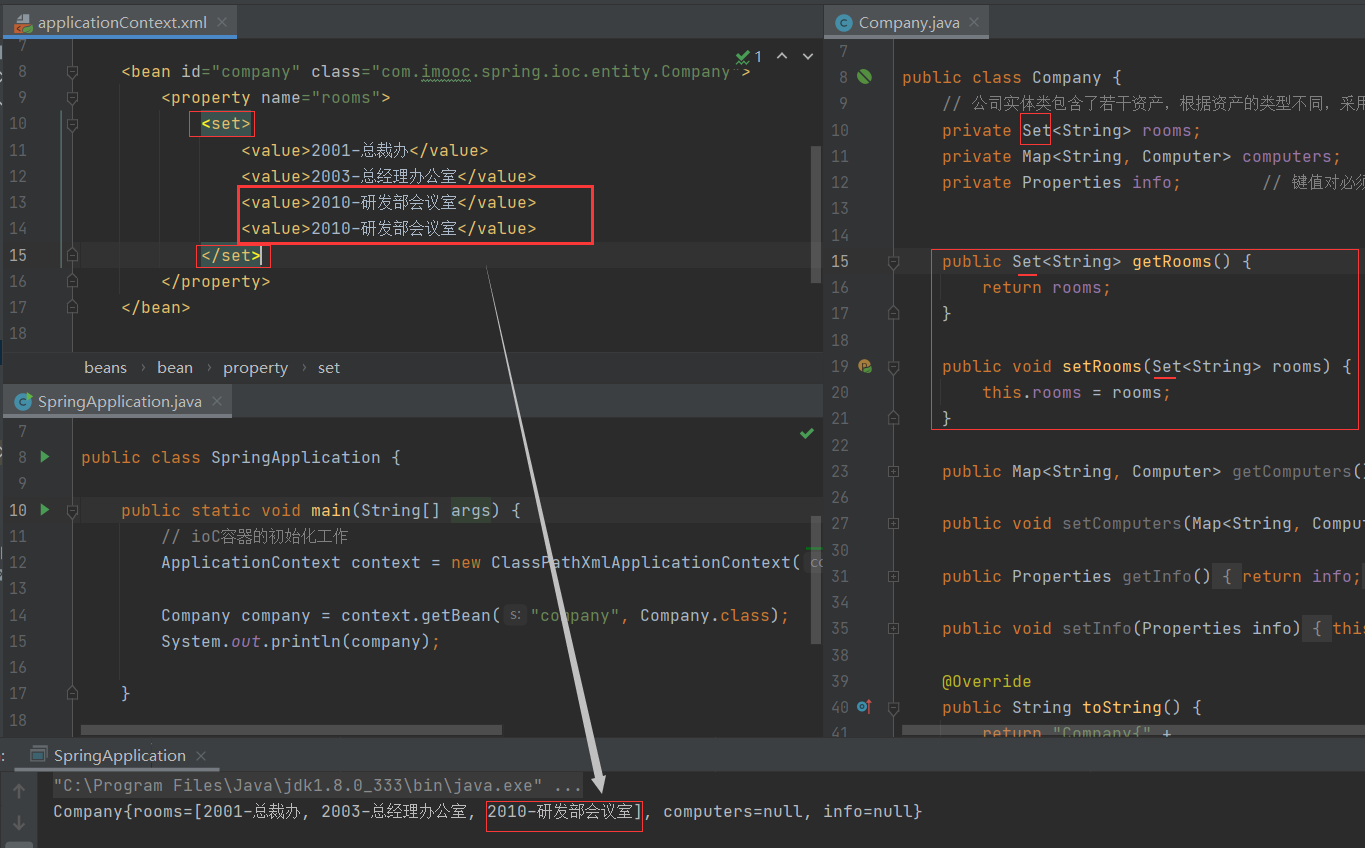
使用set数据结构类型来保存:因为结果会自动去重
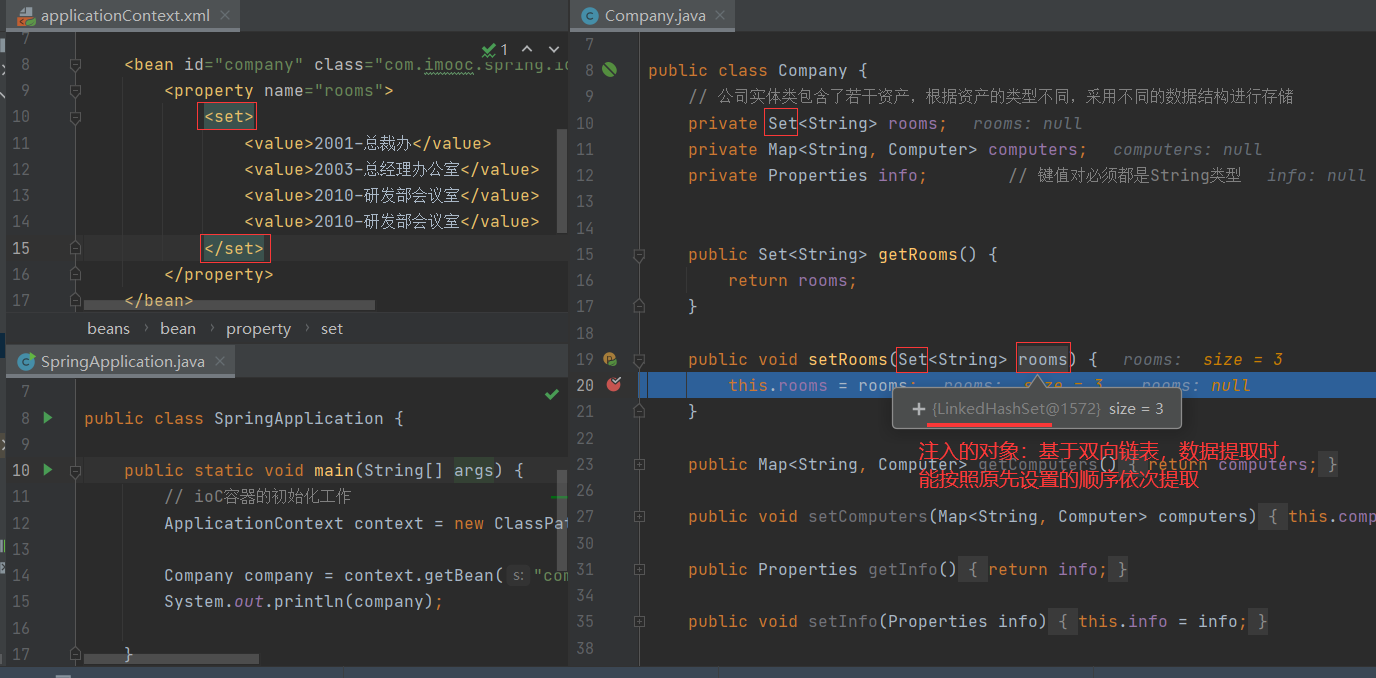
另一个疑惑:set不是无序的吗?怎么会这么有序,且是按照输入的顺序排列的?
这是因为applicationContext,利用 set 标签生成的是一个 LinkedHashSet 对象:基于双向链表,数据提取时,能够按照原先设置的顺序依次提取:
rooms属性设置好了。接下来,再看computers属性,这个Map集合。
5.computers属性
在配置文件applicationContext.xml中:
<?xml version="1.0" encoding="UTF-8"?>
<beans ...>

    <!--    创建一个名为c1的计算机对象-->  //
    <bean id="c1" class="com.imooc.spring.ioc.entity.Computer">
        <constructor-arg name="brand" value="联想"/>
        <constructor-arg name="type" value="台式机"/>
        <constructor-arg name="sn" value="8389283012"/>
        <constructor-arg name="price" value="3085"/>
    </bean>


    <!--创建一个名为company的公司对象-->
    <bean id="company" class="com.imooc.spring.ioc.entity.Company">
        <property name="rooms">
            <set>
                <value>2001-总裁办</value>
                <value>2003-总经理办公室</value>
                <value>2010-研发部会议室</value>
                <value>2010-研发部会议室</value>
            </set>
        </property>
        <property name="computers">
            <map>             // 因为每一个value都是一个引用的computer对象,所以用value-ref标签
                <entry key="dev-88172" value-ref="c1"/>
            </map>
        </property>
    </bean>

</beans>- 因为实体类Computer包含四个属性,通过构造方法来实例化对象,所以使用
constructor-arg标签来设置。
在应用入口类SpringApplication.java中:(不变)
public class SpringApplication {

    public static void main(String[] args) {
        // ioC容器的初始化工作
        ApplicationContext context = new ClassPathXmlApplicationContext("classpath:applicationContext.xml");

        Company company = context.getBean("company", Company.class);
        System.out.println(company);
    }
}
结果为:
map设置成功生效:
Company{
    rooms=[2001-总裁办, 2003-总经理办公室, 2010-研发部会议室],
    computers={dev-88172=Computer{brand='联想', type='台式机', sn='8389283012', price=3085.0}},
    info=null}
6.
不足:
上述每次编写一个entry标签时,还要额外创建一个新的bean,两者分开,不方便程序管理。
解决:
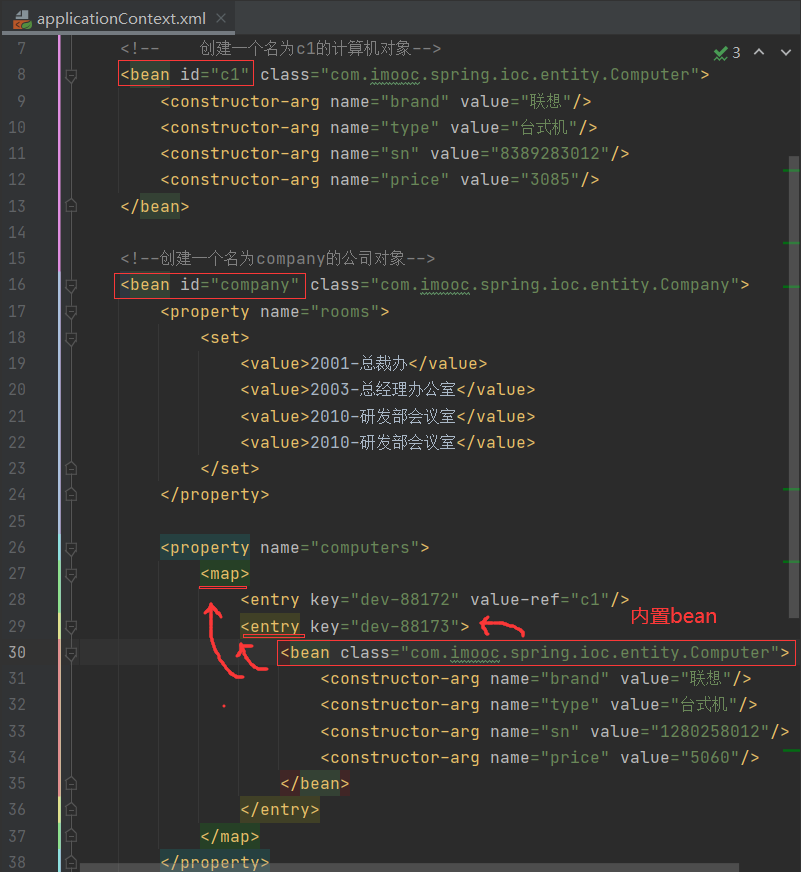
在能使用引用标签即ref标签、value-ref标签的地方,都支持内置bean:
- 优点:是一种简化写法
- 缺点:内置bean只能供当前的key键私人使用
在配置文件applicationContext.xml中:
<?xml version="1.0" encoding="UTF-8"?>
<beans ...>

    <!--    创建一个名为c1的计算机对象-->
    <bean id="c1" class="com.imooc.spring.ioc.entity.Computer">
        <constructor-arg name="brand" value="联想"/>
        <constructor-arg name="type" value="台式机"/>
        <constructor-arg name="sn" value="8389283012"/>
        <constructor-arg name="price" value="3085"/>
    </bean>

    <!--创建一个名为company的公司对象-->
    <bean id="company" class="com.imooc.spring.ioc.entity.Company">
        <property name="rooms">
            <set>
                <value>2001-总裁办</value>
                <value>2003-总经理办公室</value>
                <value>2010-研发部会议室</value>
                <value>2010-研发部会议室</value>
            </set>
        </property>

        <property name="computers">
            <map>            // 对map来说,核心配置就是在里面编写一系列的entry标签
                <entry key="dev-88172" value-ref="c1"/>

                <entry key="dev-88173">        // 这里entry标签直接闭合,用内置bean标签,来动态引用对象
                    <bean class="com.imooc.spring.ioc.entity.Computer">
                        <constructor-arg name="brand" value="联想"/>
                        <constructor-arg name="type" value="台式机"/>
                        <constructor-arg name="sn" value="1280258012"/>
                        <constructor-arg name="price" value="5060"/>
                    </bean>
                </entry>

            </map>
        </property>

    </bean>

</beans>在应用入口类SpringApplication.java中:(不变,此处略)。
结果为:
Company{
    rooms=[2001-总裁办, 2003-总经理办公室, 2010-研发部会议室],
    computers={dev-88172=Computer{brand='联想', type='台式机', sn='8389283012', price=3085.0},
               dev-88173=Computer{brand='联想', type='台式机', sn='1280258012', price=5060.0}},
    info=null}
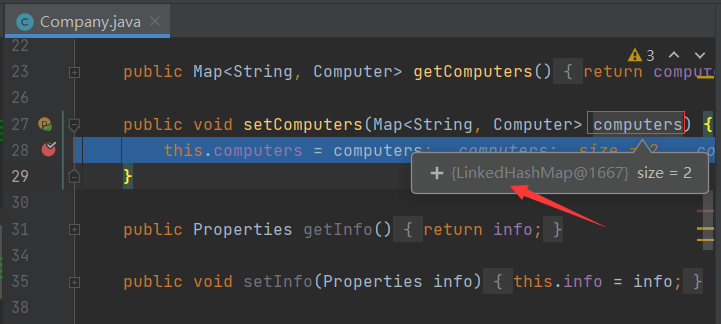
断点调试,查看map的类型:
发现竟然是LinkedHashMap,同上面的 LinkedHashSet 一样,都是基于双向链表,数据提取时,能够按照原先设置的顺序依次提取。
综上所述, 对map来说,核心配置就是在里面编写一系列的entry标签。
接下来,看info属性,这个properties集合。
6.info属性
在配置文件applicationContext.xml中
开始设置属性对象:必须保证键值对全是字符串:
<?xml version="1.0" encoding="UTF-8"?>
<beans ...>

    <!--    创建一个名为c1的计算机对象-->
    <bean id="c1" class="com.imooc.spring.ioc.entity.Computer">
        <constructor-arg name="brand" value="联想"/>
        <constructor-arg name="type" value="台式机"/>
        <constructor-arg name="sn" value="8389283012"/>
        <constructor-arg name="price" value="3085"/>
    </bean>

    <!--创建一个名为company的公司对象-->
    <bean id="company" class="com.imooc.spring.ioc.entity.Company">
        <!--属性1:rooms-->
        <property name="rooms">
            <set>
                <value>2001-总裁办</value>
                <value>2003-总经理办公室</value>
                <value>2010-研发部会议室</value>
                <value>2010-研发部会议室</value>
            </set>
        </property>

        <!--属性2:computers-->
        <property name="computers">
            <map>
                <entry key="dev-88172" value-ref="c1"/>
                <entry key="dev-88173">
                    <bean class="com.imooc.spring.ioc.entity.Computer">
                        <constructor-arg name="brand" value="联想"/>
                        <constructor-arg name="type" value="台式机"/>
                        <constructor-arg name="sn" value="1280258012"/>
                        <constructor-arg name="price" value="5060"/>
                    </bean>
                </entry>
            </map>
        </property>

        <!--属性3:info-->
        <property name="info">
            <props>                // 用properties集合,来承载value:键值对只能是字符串型
                <prop key="phone">010-12345678</prop>                   // 这里的value直接写在标签体中
                <prop key="address">北京市朝阳区XX路XX大厦</prop>
                <prop key="website">http://www.xxx.com</prop>
            </props>
        </property>

    </bean>

</beans>在应用入口类SpringApplication.java中:
public class SpringApplication {

    public static void main(String[] args) {
        // ioC容器的初始化工作
        ApplicationContext context = new ClassPathXmlApplicationContext("classpath:applicationContext.xml");

        Company company = context.getBean("company", Company.class);
        System.out.println(company);

        String website = company.getInfo().getProperty("website");        // 获取key为website的value值
        System.out.println(website);
    }
}
结果为:
Company{
    rooms=[2001-总裁办, 2003-总经理办公室, 2010-研发部会议室],
    computers={dev-88172=Computer{brand='联想', type='台式机', sn='8389283012', price=3085.0},
               dev-88173=Computer{brand='联想', type='台式机', sn='1280258012', price=5060.0}},
    info={phone=010-12345678, address=北京市朝阳区XX路XX大厦, website=http://www.xxx.com}}

http://www.xxx.com
综上所述,讲解了如何通过IoC容器,对 list、set、map、properties等包含多数据的集合对象,进行设置。
IT老齐老师设计的课,就是精巧啊 :)
3.3 查看容器内的对象
上述:如何在IoC容器内创建对象,以及设置对象之间的关系。
但是,这些设置都是通过脑补完成的。当工程越来越大,对象越来越多的时候,我们又如何知道,当前容器中到底有哪些对象?对象又是哪些类型呢?
利用上节的工程s04。
1.使用getBeanDefinitionNames()方法,查看容器内的对象
在应用入口类SpringApplication.java中:
public class SpringApplication {

    public static void main(String[] args) {
        // ioC容器的初始化工作
        ApplicationContext context = new ClassPathXmlApplicationContext("classpath:applicationContext.xml");

        Company company = context.getBean("company", Company.class);
        System.out.println(company);

        String website = company.getInfo().getProperty("website");
        System.out.println(website);
        System.out.println("=========================================");

        // 获取IoC容器内所有的beanId的数组
        String[] beanNames = context.getBeanDefinitionNames();        // 使用getBeanDefinitionNames()方法
        for (String beanName : beanNames) {
            System.out.println(beanName);
        }
    }
}
结果为:
Company{
    rooms=[2001-总裁办, 2003-总经理办公室, 2010-研发部会议室],
    computers={dev-88172=Computer{brand='联想', type='台式机', sn='8389283012', price=3085.0},
               dev-88173=Computer{brand='联想', type='台式机', sn='1280258012', price=5060.0}},
    info={phone=010-12345678, address=北京市朝阳区XX路XX大厦, website=http://www.xxx.com}
}
http://www.xxx.com
=========================================
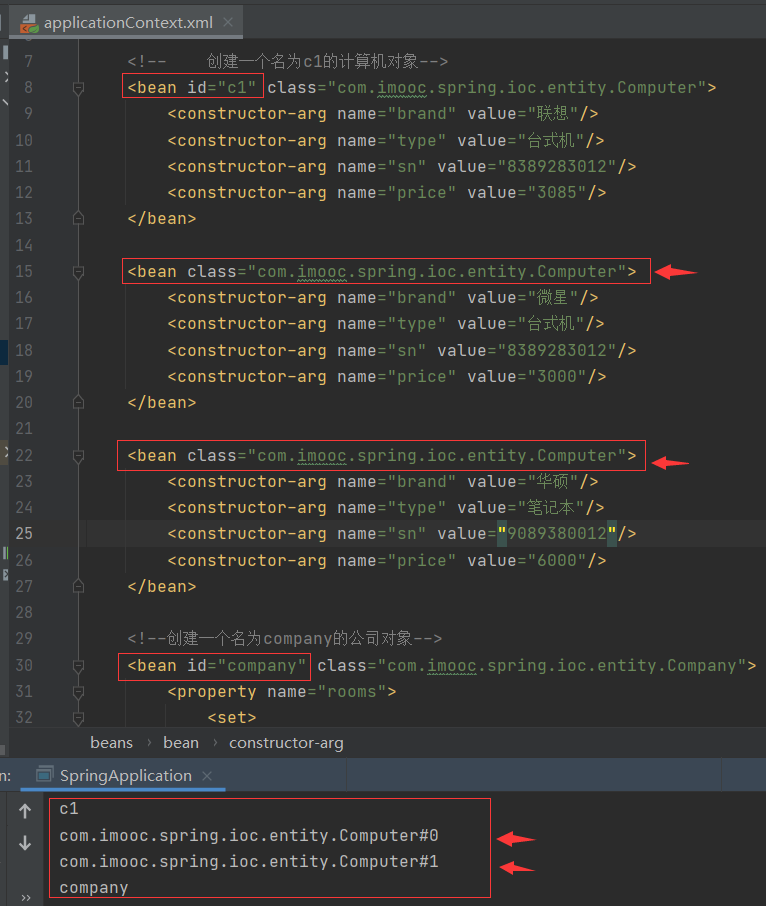
c1
company
之所以只有两个,是因为:
内置bean,是私有的,并不会在IoC容器中创建一个新的beanId。
2.匿名的bean对象:当一个bean没有id、name属性时,
用类名全称作为beanId
当有多个同类型的匿名bean时,会自动给其编号:
当要获取bean时,如果包含多个同类型的匿名bean,如果只根据类名全称,默认指向第一个;
否则,必须指定编号才可以:
因为上述对匿名的bean的编号,是不稳定的,所以实际工作中不推荐使用。了解其命名规则即可。
3.查看这个bean的类型、内容
对于object对象,可以通过方法getClass()得到它的类对象,以及这个类的完整名称:
在应用入口类SpringApplication.java中:
public class SpringApplication {

    public static void main(String[] args) {
        // ioC容器的初始化工作
        ApplicationContext context = new ClassPathXmlApplicationContext("classpath:applicationContext.xml");

        // 获取IoC容器内所有的beanId的数组
        String[] beanNames = context.getBeanDefinitionNames();
        for (String beanName : beanNames) {

            System.out.println(beanName);
            System.out.println("类型:" + context.getBean(beanName).getClass().getName());
            System.out.println("内容:" + context.getBean(beanName).toString());

        }
    }
}
结果为:
c1
类型:com.imooc.spring.ioc.entity.Computer
内容:Computer{brand='联想', type='台式机', sn='8389283012', price=3085.0}

com.imooc.spring.ioc.entity.Computer#0
类型:com.imooc.spring.ioc.entity.Computer
内容:Computer{brand='微星', type='台式机', sn='8389283012', price=3000.0}

com.imooc.spring.ioc.entity.Computer#1
类型:com.imooc.spring.ioc.entity.Computer
内容:Computer{brand='华硕', type='笔记本', sn='9089380012', price=6000.0}

company
类型:com.imooc.spring.ioc.entity.Company
内容:Company{rooms=[2001-总裁办, 2003-总经理办公室, 2010-研发部会议室],
           computers={dev-88172=Computer{brand='联想', type='台式机', sn='8389283012', price=3085.0},
                      dev-88173=Computer{brand='联想', type='台式机', sn='1280258012', price=5060.0}},
           info={phone=010-12345678, address=北京市朝阳区XX路XX大厦, website=http://www.xxx.com}}
上述技能,挺实用。
四、Bean对象的作用域及生命周期
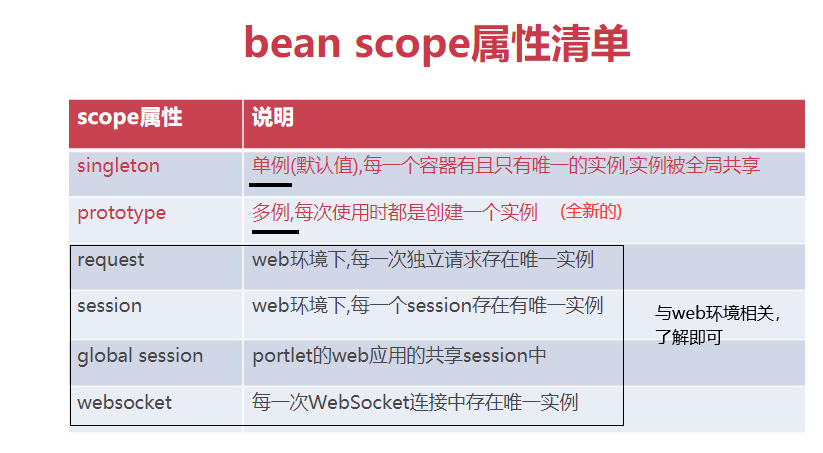
4.1 bean scope属性
1.scope的定义
bean scope属性:用于决定对象何时被创建、作用范围。能影响容器内对象的数量
默认情况下,bean对象会在IoC容器创建后,自动实例化,全局唯一
scope:范围
2.scope的用法
3.scope的属性值
重点是前两个:决定对象何时被创建
- 后四个,在使用Spring 开发web应用时会用到。指的是bean对象的生存范围(作用范围)。
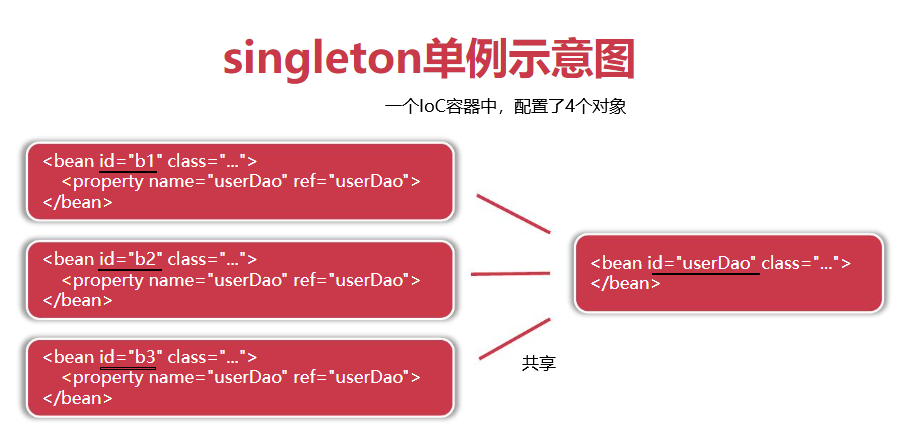
4.singleton单例
(1)为什么默认是单例?
因为单例,四个对象是在IoC容器启动时,创建的。
如果不是单例,是多例,那么就是在每一次需要某对象时,才去创建它,这会额外占用内存空间、CPU计算资源。
上述因为频繁创建对象,带来的资源损耗,小应用可忽略,但是,对于BAT公司中,动辄几十万用户同时访问,就必须考虑在内。
反之,单例,全局只需要创建一次,能避免上述问题。
(2)三个对象,同时发起调用操作,是否会出现阻塞问题?
不会。因为是单例,更是多线程。
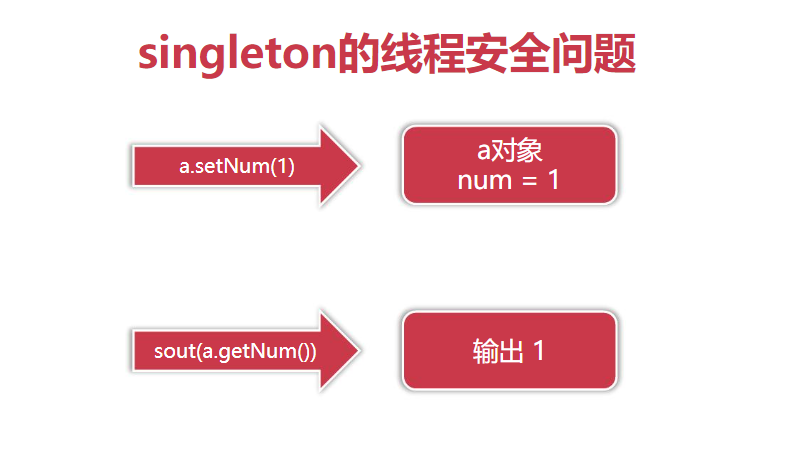
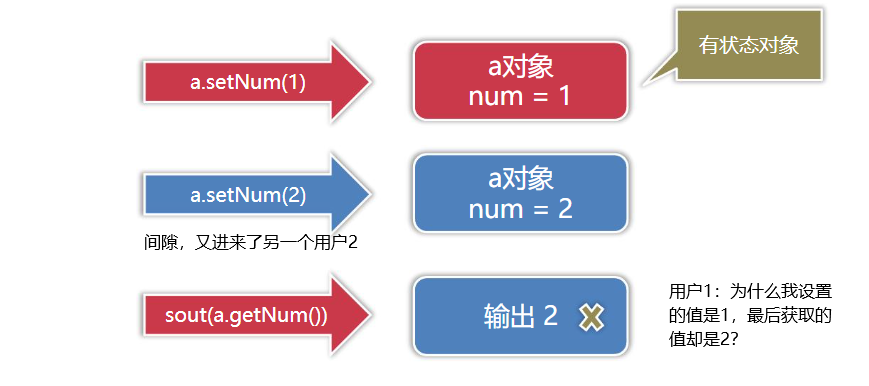
(3)单例多线程的隐患:singleton的线程安全问题
当只有一个用户:
有序运行
但是,如果上述代码放在多线程环境下,就会出如下线程安全问题:
下面用户1的问题
如何解决:
- 方案1:将多线程的并行运行,改为串行的排队运行;
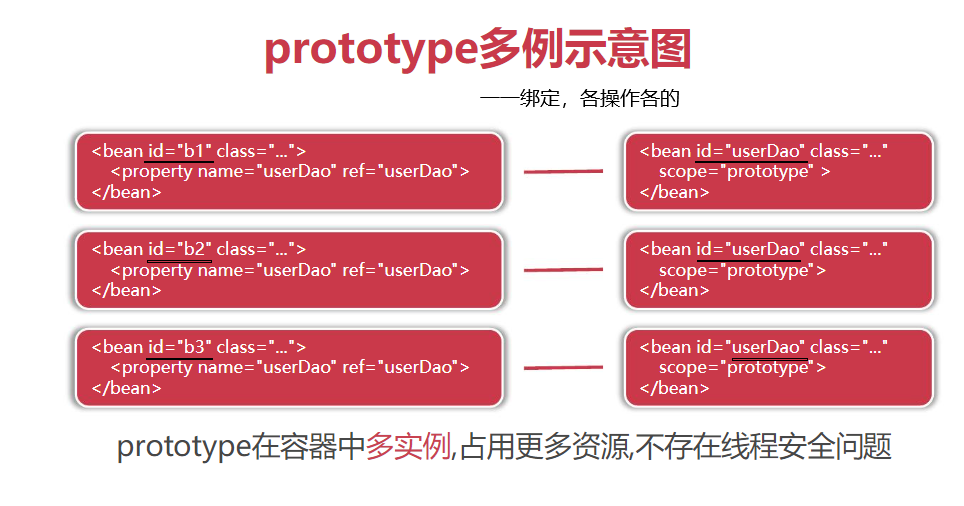
- 方案2:创建多个对象,即为每一个用户分配一个只属于他自己的对象,各操作各的
4.prototype多例
上述方案2,放在Spring IoC中,就称之为prototype多例。
prototype多例示意图:
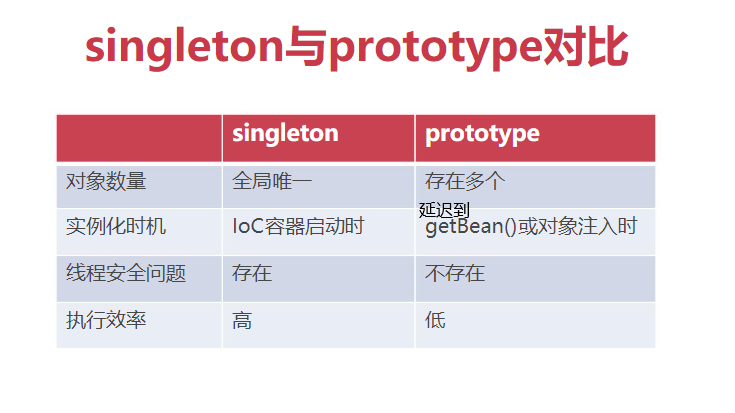
5.singleton单例与prototype多例的对比
- 对于小数据量、小用户量、小访问量等应用场景,两者带来的性能差异忽略不计。
- 对于互联网多用户、高并发的应用场景,就要考虑。
4.2 演示:bean scope的实际应用
1.搭建工程的基础结构
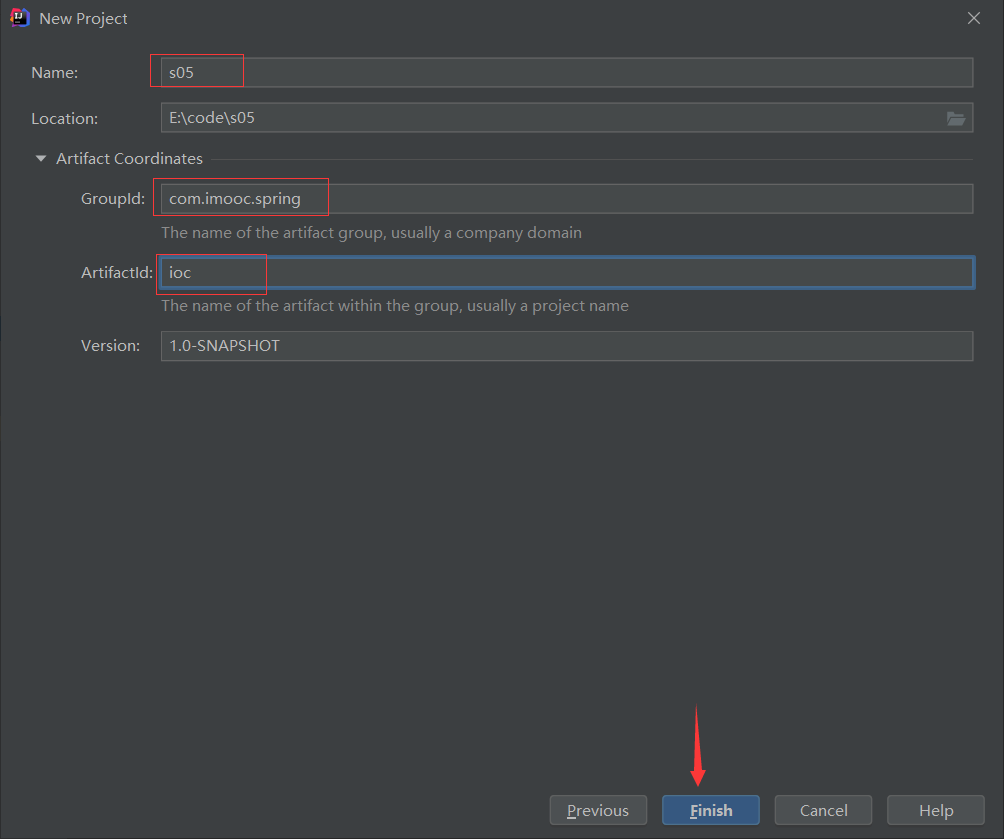
新建Maven工程s05:
新建工程的说明文件readme.md:
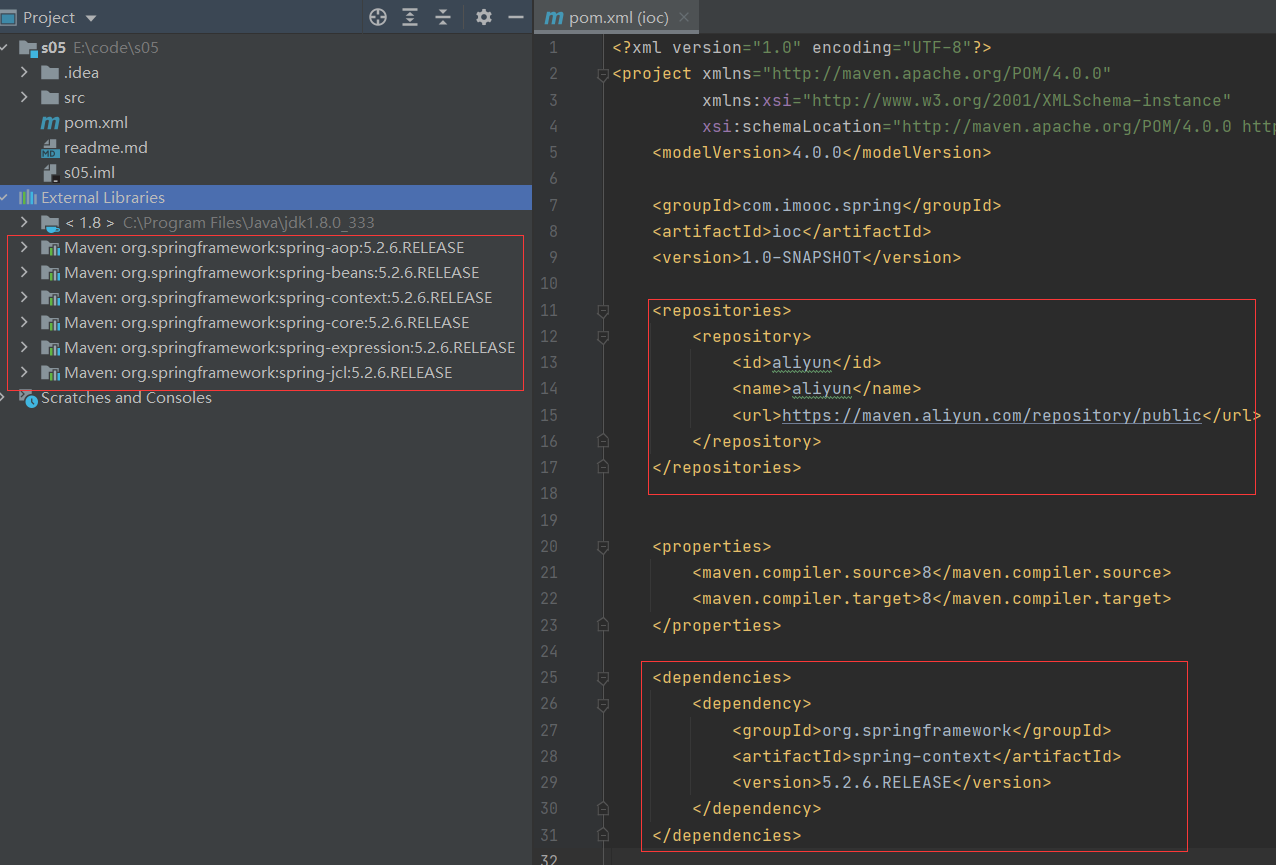
以实际应用,演示singleton与prototype的区别在工程的配置文件pom.xml中,为能使用Spring 框架,引入依赖spring-context,并右上角加载:
新建Spring 框架的配置文件applicationContext.xml,并增加官网规定的格式头:
<?xml version="1.0" encoding="UTF-8"?>
<beans xmlns="http://www.springframework.org/schema/beans"
       xmlns:xsi="http://www.w3.org/2001/XMLSchema-instance"
       xsi:schemaLocation="http://www.springframework.org/schema/beans
        https://www.springframework.org/schema/beans/spring-beans.xsd">


</beans>应用入口类SpringApplication.java:
public class SpringApplication {

    public static void main(String[] args) {
        ApplicationContext context = new ClassPathXmlApplicationContext("classpath:applicationContext.xml");


    }
}
2.编写自己的代码
新建用户dao类UserDao.java
public class UserDao {

    public UserDao(){
        System.out.println("UserDao已创建:" + this);
    }
}
在Spring 框架的配置文件applicationContext.xml中,进行配置:
<?xml version="1.0" encoding="UTF-8"?>
<beans ...>

    <bean id="userDao" class="com.imooc.spring.ioc.dao.UserDao">

    </bean>

</beans>在应用入口类SpringApplication.java中:
在只初始化IoC容器时:
public class SpringApplication {

    public static void main(String[] args) {
        ApplicationContext context = new ClassPathXmlApplicationContext("classpath:applicationContext.xml");        // IoC容器初始化时


    }
}
结果为:
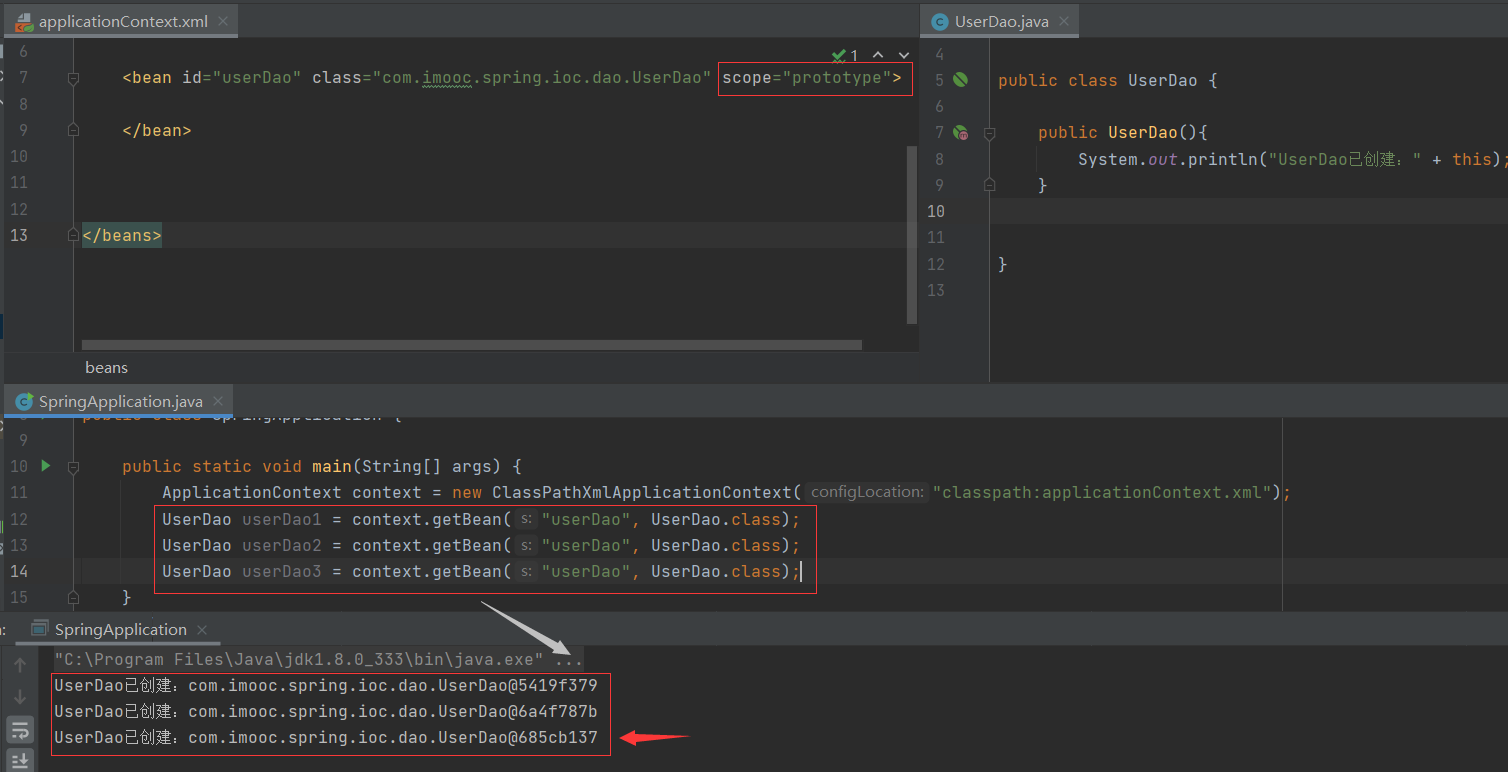
UserDao已创建:com.imooc.spring.ioc.dao.UserDao@3cbbc1e0这说明,默认情况下,在IoC容器初始化时,实例化了 UserDao对象。
3.与多例的区别
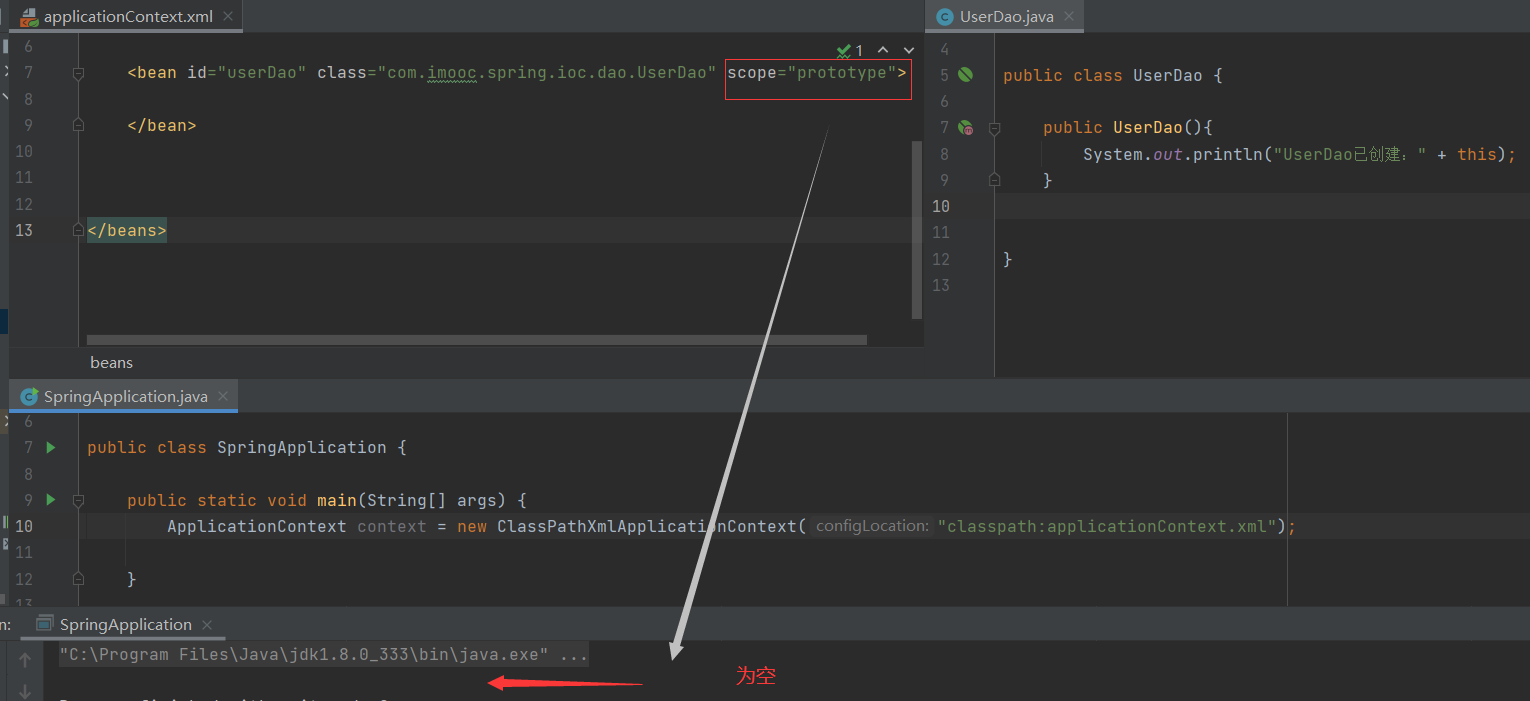
相比之下:
当scope="prototype"时,实例化创建对象的时机,并不在IoC容器初始化时,而是延迟到获取bean时才创建。
以上,是单例和多例的区别。
4.再创建一个 UserService对象,并为其注入一个依赖的 UserDao对象
新建业务服务类UserService.java,其底层是依赖 UserDao对象的:
public class UserService {
    private UserDao userDao;        // 底层是依赖 UserDao对象的

    public UserDao getUserDao() {
        return userDao;
    }

    public void setUserDao(UserDao userDao) {
        this.userDao = userDao;
    }
}然后,在applicationContext.xml文件中进行配置:
再创建一个 UserService对象,并为其注入一个依赖的 UserDao对象
<?xml version="1.0" encoding="UTF-8"?>
<beans ...>

    <!--    创建一个UserDao对象-->
    <bean id="userDao" class="com.imooc.spring.ioc.dao.UserDao" scope="prototype">
    </bean>

    <!--    创建一个UserService对象-->
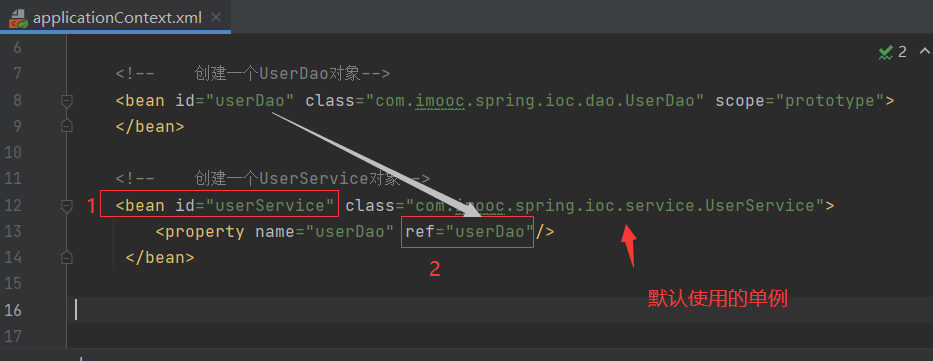
    <bean id="userService" class="com.imooc.spring.ioc.service.UserService">
        <property name="userDao" ref="userDao"/>            // 并为其注入一个依赖的 UserDao对象
     </bean>

</beans>为方便演示,在UserService.java中增加输出语句:
public class UserService {
    private UserDao userDao;

    public UserService(){
        System.out.println("UserService对象已创建:" + this);          // 方便演示
    }

    public UserDao getUserDao() {
        return userDao;
    }

    public void setUserDao(UserDao userDao) {
        System.out.println("调用setUserDao方法:" + userDao);        // 方便演示
        this.userDao = userDao;
    }
}
5.两个问题
问题1:基于上述 XML的配置,在IoC容器初始化时,会产生几个对象?
2个。
结果为:
UserService对象已创建:com.imooc.spring.ioc.service.UserService@5a61f5df
UserDao已创建:com.imooc.spring.ioc.dao.UserDao@5034c75a
调用setUserDao方法:com.imooc.spring.ioc.dao.UserDao@5034c75a
问题2:bean的创建顺序,是按照书写的前后顺序。为什么UserService对象先创建、UserDao对象后创建?
因为,单例模式下,bean的创建顺序,确实是按照书写的前后顺序。
但是,UserDao增加了scope="prototype"变成多例模式时,IoC容器启动时并不会创建它。
当UserService对象关联到UserDao对象时,同样会触发实例化对象的操作。
验证下:
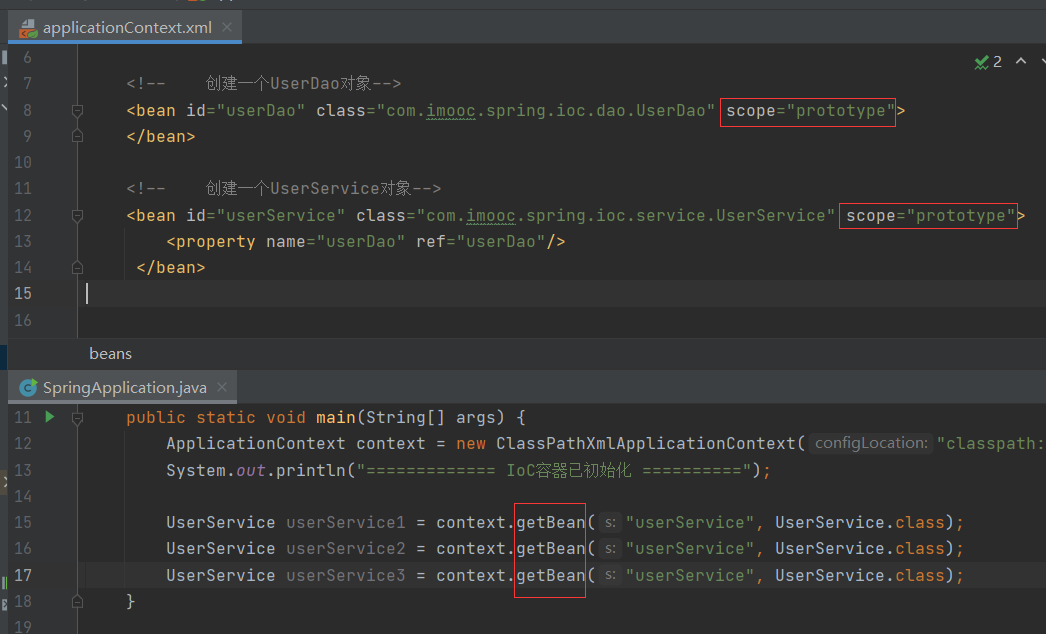
当两个对象全是多例模式时:
结果为:
确实是在IoC容器启动之时,一个对象也没有创建;
调用了3次getBean()方法,所以创建了3次UserService对象以及依赖对象
============= IoC容器已初始化 ==========
UserService对象已创建:com.imooc.spring.ioc.service.UserService@1753acfe
UserDao已创建:com.imooc.spring.ioc.dao.UserDao@39c0f4a
调用setUserDao方法:com.imooc.spring.ioc.dao.UserDao@39c0f4a

UserService对象已创建:com.imooc.spring.ioc.service.UserService@27c20538
UserDao已创建:com.imooc.spring.ioc.dao.UserDao@72d818d1
调用setUserDao方法:com.imooc.spring.ioc.dao.UserDao@72d818d1

UserService对象已创建:com.imooc.spring.ioc.service.UserService@6e06451e
UserDao已创建:com.imooc.spring.ioc.dao.UserDao@59494225
调用setUserDao方法:com.imooc.spring.ioc.dao.UserDao@59494225
6.实际项目中,Dao、Service这些具体的类,到底应该单例还是多例?
答:绝大多数,应该单例。包括以后学习到的Controller类。
之所以出现线程安全问题,根源在于某个对象的内置属性,在运行时,是在不断的发生变化:
但是,在真正的实际应用环境下,一旦Dao、Service这些具体的类的对象被创建,其内置属性,在运行时,是不发生变化的。
所以,单例模式即可。
4.3 bean对象的生命周期:五阶段
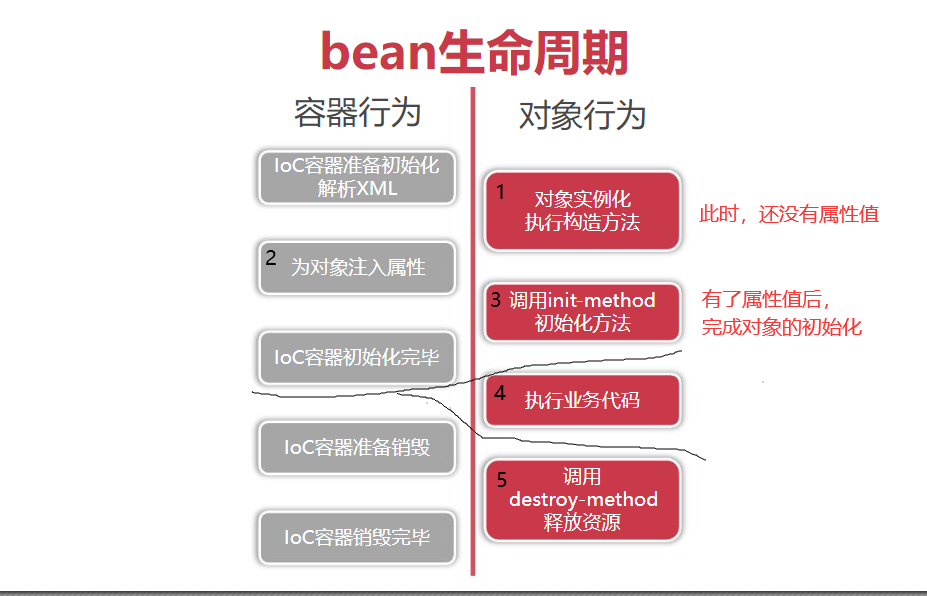
在IoC容器的各个阶段,bean对象都做了哪些事儿?
1.IoC容器行为、 bean对象行为的图示
- bean对象,主要经过了5个阶段,以上。
2.示例
(1)
以s05工程为例,演示一个bean对象的生命周期。
新建实体类Order.java
public class Order {
    private Float price;
    private Integer quantity;
    private Float total;


    public Float getPrice() {
        return price;
    }

    public void setPrice(Float price) {
        this.price = price;
    }

    public Integer getQuantity() {
        return quantity;
    }

    public void setQuantity(Integer quantity) {
        this.quantity = quantity;
    }

    public Float getTotal() {
        return total;
    }

    public void setTotal(Float total) {
        this.total = total;
    }

    // 实例方法:支付
    public void pay(){
        System.out.println("订单金额为:" + total);
    }
}
(2)
回到XML,对上述的实体类Order进行配置:
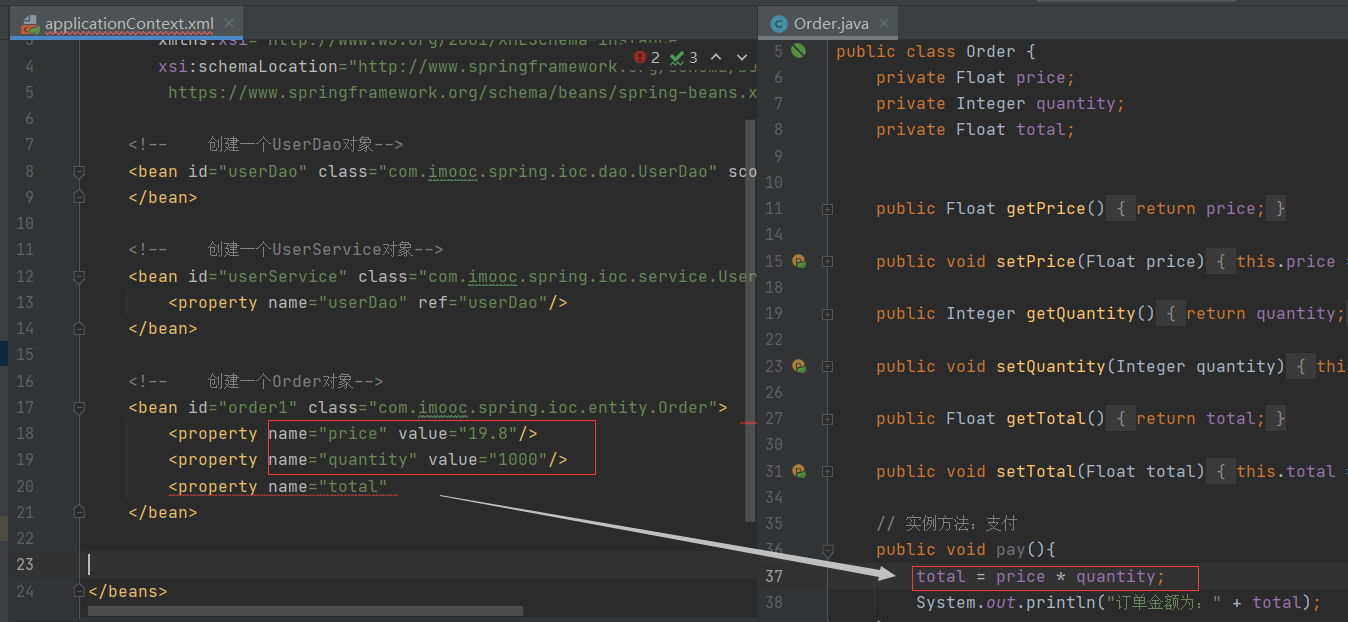
设置总价时,难道要手动的计算出总价,并赋值给它吗?画蛇添足。应该让程序自动的算出来。即基于单价、采购的数量,自动的计算出总价。
那么,在哪里来自动的计算呢?
方案1:在每次调用实例方法pay时,进行计算:
缺点:如果某对象调用pay实例方法1万次,那么就会计算1万次。但是,单价、采购数量是固定的,调用多少次还是哪个总价,相当于做了9999次无用功。如下:
方案2:init-method()方法,应运而生。
利用的就是 init-method是在IoC容器设置完属性以后,再去执行的特点。
即,设置完单价、采购数量属性后,再去执行 init-method方法来计算总价。
<?xml version="1.0" encoding="UTF-8"?>
<beans ...>

    <!--    创建一个Order对象-->
    <bean id="order1" class="com.imooc.spring.ioc.entity.Order" init-method="init">        // 使用init-method()方法
        <property name="price" value="19.8"/>
        <property name="quantity" value="1000"/>
    </bean>
</beans>在实体类Order中:
新建init方法,将计算属性total总价的代码放在这里面:
public class Order {
    private Float price;
    private Integer quantity;
    private Float total;

    public Order(){
        System.out.println("创建Order对象:" + this);    // 方便演示
    }

    public Float getPrice() {
        return price;
    }

    public void setPrice(Float price) {
        System.out.println("设置price:" + price);            // 方便演示
        this.price = price;
    }

    public Integer getQuantity() {
        return quantity;
    }

    public void setQuantity(Integer quantity) {
        System.out.println("设置quantity:" + quantity);       // 方便演示
        this.quantity = quantity;
    }

    public Float getTotal() {
        return total;
    }

    public void setTotal(Float total) {
        this.total = total;
    }

    // 实例方法:init方法,计算属性total总价
    public void init(){
        System.out.println("执行init()方法");                // 方便演示
        total = price * quantity;
    }

    // 实例方法:支付
    public void pay(){
        System.out.println("订单金额为:" + total);
    }
}
在应用入口类:
public class SpringApplication {

    public static void main(String[] args) {
        ApplicationContext context = new ClassPathXmlApplicationContext("classpath:applicationContext.xml");
        System.out.println("============= IoC容器已初始化 ==========");

        Order order1 = context.getBean("order1", Order.class);
        order1.pay();
    }
}
结果为:
清晰的描述出了一个对象,从无到有的过程:
创建Order对象:com.imooc.spring.ioc.entity.Order@52af6cff
设置price:19.8
设置quantity:1000
执行init()方法                    // 此时,在IoC容器初始化时,就已经计算出了总价totla的值了
============= IoC容器已初始化 ==========
订单金额为:19800.0               // 这里的只是调用已计算好的total
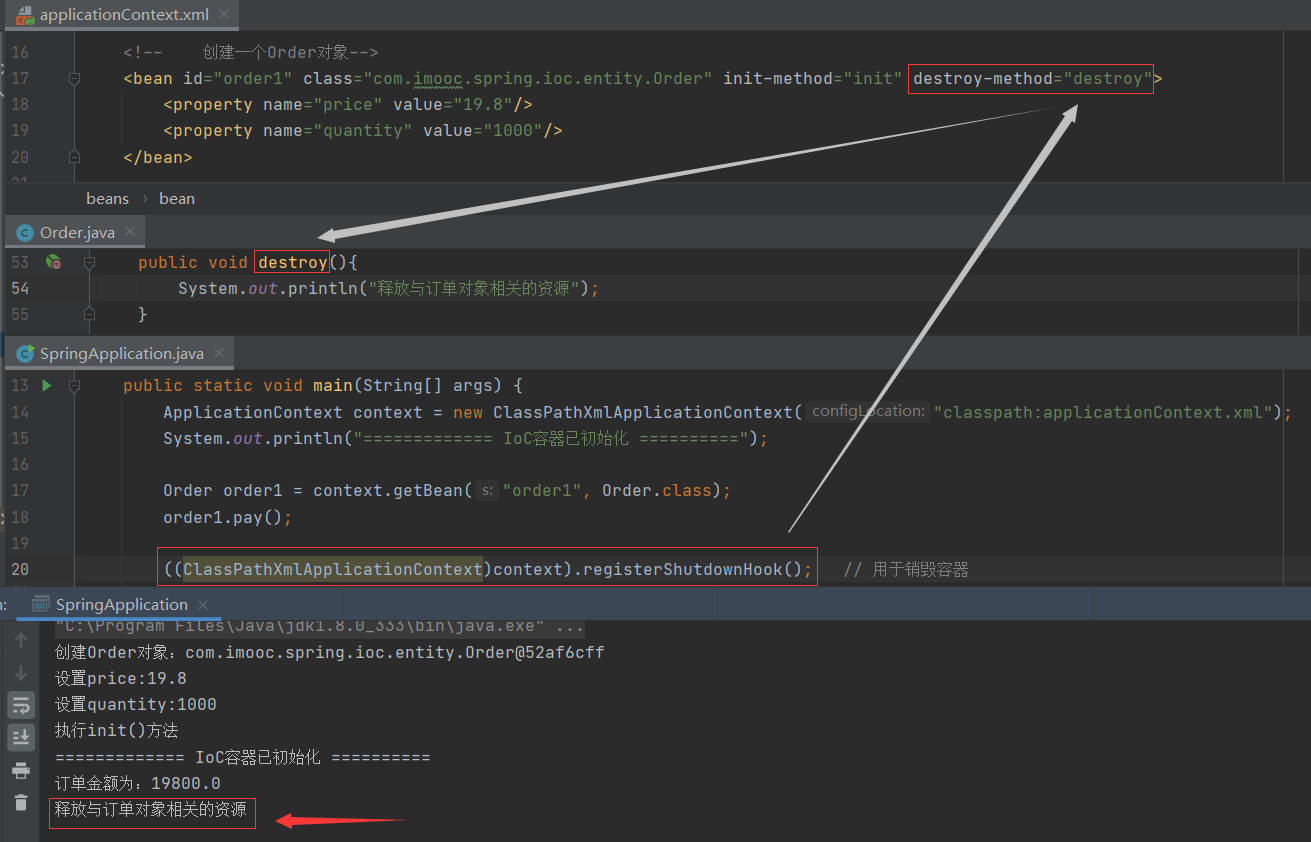
3.在IoC容器销毁中,希望对资源进行释放:
应用入口类中,使用registerShutdownHook()方法来销毁容器;则会自动调用和触发XML配置文件中的destroy()方法
资源:
可以是一个文件,也可以是一个网络的连接,还可以是其他系统方法的调用
综上所述,一个对象的完整生命周期,就已演示完毕。
五、模拟开发一个极简 IoC容器
5.1 核心功能点
目的:了解IoC容器背后的故事。
简单模拟Spring IoC容器的实现方式,只展示核心思路,非完整代码。
其核心功能是:
(1)如何让获取本地的配置文件?
(2)如何读取配置文件?
(3)如何使用反射来创建对象,并使用反射为对象的属性进行赋值注入?
抛离Spring 框架,自主实现一个极简 IoC容器。
5.2 搭建基础结构
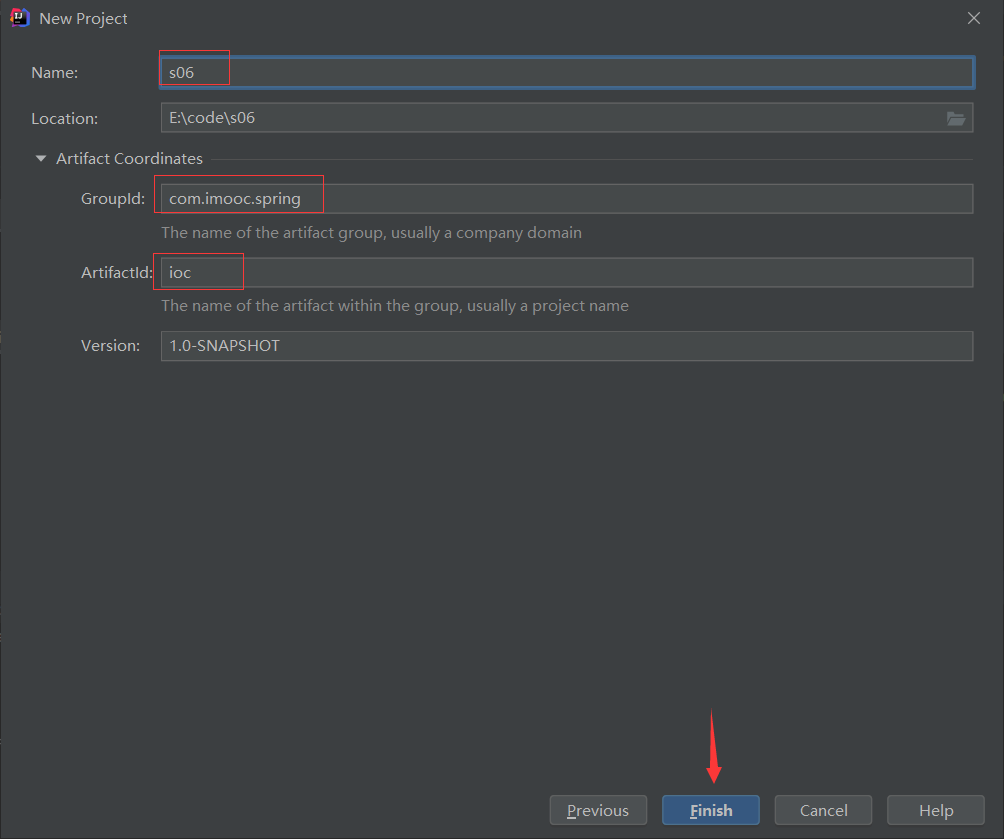
新建Maven工程:
新建实体类com.imooc.spring.ioc.entity.Apple:
public class Apple {
    private String title;
    private String color;
    private String origin;

    public String getTitle() {
        return title;
    }

    public void setTitle(String title) {
        this.title = title;
    }

    public String getColor() {
        return color;
    }

    public void setColor(String color) {
        this.color = color;
    }

    public String getOrigin() {
        return origin;
    }

    public void setOrigin(String origin) {
        this.origin = origin;
    }
}新建配置文件applicationContext.xml,对上述实体类 Apple进行配置:
<?xml version="1.0" encoding="UTF-8" ?>

<beans>
    <bean id="sweetApple" class="com.imooc.spring.ioc.entity.Apple">
        <property name="title" value="红富士"/>
        <property name="color" value="红色"/>
        <property name="origin" value="欧洲"/>
    </bean>
</beans>
上述配置文件,是如何实现在运行时,创建对象的呢?
自己实现一个IoC容器。
5.3 模拟编写ApplicationContext接口、实现类ClassPathXmlApplicationContext
模拟一个Spring的ApplicationContext接口:
public interface ApplicationContext {
    public Object getBean(String beanId);        // 抽象方法是 getBean()
}针对上述接口,新建一个实现类ClassPathXmlApplicationContext.java:
public class ClassPathXmlApplicationContext implements ApplicationContext {

    // 用Map对象,作为IoC容器
    private Map iocContainer = new HashMap();

    // 在默认构造方法中,在对象初始化时,读取和处理XML配置文件
    public ClassPathXmlApplicationContext(){
        try {// 获取配置文件的物理地址
            String filePath = this.getClass().getResource("/applicationContext.xml").getPath();
            // 如果物理地址包含中文,就会出现文件找不到的情况,因此应使用URL的解码
            filePath = new URLDecoder().decode(filePath, "UTF-8");
            // 对配置文件进行解析


        } catch (Exception e) {

        }

    }


    @Override
    public Object getBean(String beanId) {
        return null;
    }
}
因为解析XML配置文件,需要两个组件依赖。
5.4 为读取XML配置文件,需引入两个组件依赖
引入两个依赖组件 Dom4j、Jaxen。其中,Jaxen又是Dom4j的底层依赖
- Dom4j是Java的XML解析组件
- Jaxen是Xpath表达式解释器
在项目的配置文件pom.xml中:
<?xml version="1.0" encoding="UTF-8"?>
<project xmlns="http://maven.apache.org/POM/4.0.0"
         xmlns:xsi="http://www.w3.org/2001/XMLSchema-instance"
         xsi:schemaLocation="http://maven.apache.org/POM/4.0.0 http://maven.apache.org/xsd/maven-4.0.0.xsd">
    <modelVersion>4.0.0</modelVersion>

    <groupId>com.imooc.spring</groupId>
    <artifactId>ioc</artifactId>
    <version>1.0-SNAPSHOT</version>

    <repositories>
        <repository>
            <id>aliyun</id>
            <name>aliyun</name>
            <url>https://maven.aliyun.com/repository/public</url>
        </repository>
    </repositories>

    <properties>
        <maven.compiler.source>8</maven.compiler.source>
        <maven.compiler.target>8</maven.compiler.target>
    </properties>

    <dependencies>
        <!--        Dom4j是Java的XML解析组件-->
        <dependency>
            <groupId>org.dom4j</groupId>
            <artifactId>dom4j</artifactId>
            <version>2.1.1</version>
        </dependency>
        <!--        Jaxen是Xpath表达式解释器-->
        <dependency>
            <groupId>jaxen</groupId>
            <artifactId>jaxen</artifactId>
            <version>1.1.6</version>
        </dependency>
    </dependencies>

</project>
5.5 模拟IoC容器,完成(实例化)创建对象的职责
1.
回到实现类ClassPathXmlApplicationContext.java中,继续编写:
public class ClassPathXmlApplicationContext implements ApplicationContext {

    // 用Map对象,作为IoC容器
    private Map iocContainer = new HashMap();

    // 在默认构造方法中,在对象初始化时,加载读取和处理XML配置文件
    public ClassPathXmlApplicationContext(){
        try {    // 1.获取配置文件的物理地址
            String filePath = this.getClass().getResource("/applicationContext.xml").getPath();
            // 如果物理地址包含中文,就会出现文件找不到的情况,因此应使用URL的解码
            filePath = new URLDecoder().decode(filePath, "UTF-8");
            // 2.根据物理地址,对配置文件进行解析
            // 利用Dom4j提供的SAXReader,来解析filePath对应的XML
            SAXReader reader = new SAXReader();
            File file = new File(filePath);             // 解析物理地址,得到一个File对象
            Document document = reader.read(file);      // 又得到一个XML文档对象
            // 3.根据XML的格式,依次读取文档
            List<Node> beans = document.getRootElement().selectNodes("bean");  //拿到bean节点的集合
            for (Node node : beans) {       // node有多种子类型,每个bean的类型是Element
                Element ele = (Element) node;
                String id = ele.attributeValue("id");     // 每个bean都有两个属性,分别是id、class
                String className = ele.attributeValue("class");
                // 通过以上两个属性,基于反射技术,实例化Apple类
                Class c = Class.forName(className);     // 反射:读取到对应的类
                Object obj = c.newInstance();          // 通过默认构造方法,创建Apple类的实例
                // 目前,beanId有了,Apple类实例化对象有了
                iocContainer.put(id, obj);      // IoC容器对新创建的实例对象,赋予了beanId进行管理
            }
            System.out.println("IoC容器初始化完毕");
        } catch (Exception e) {
            e.printStackTrace();
        }
    }
}
以上,IoC容器创建对象的职责,已完成。
2.
再重写接口中的getBean()方法:
public class ClassPathXmlApplicationContext implements ApplicationContext {

    // 用Map对象,作为IoC容器
    private Map iocContainer = new HashMap();

    // 在默认构造方法中,在对象初始化时,加载读取和处理XML配置文件
    public ClassPathXmlApplicationContext(){
        try {    // 1.获取配置文件的物理地址
            String filePath = this.getClass().getResource("/applicationContext.xml").getPath();
            // 如果物理地址包含中文,就会出现文件找不到的情况,因此应使用URL的解码
            filePath = new URLDecoder().decode(filePath, "UTF-8");
            // 2.根据物理地址,对配置文件进行解析
            // 利用Dom4j提供的SAXReader,来解析filePath对应的XML
            SAXReader reader = new SAXReader();
            File file = new File(filePath);             // 解析物理地址,得到一个File对象
            Document document = reader.read(file);      // 又得到一个XML文档对象
            // 3.根据XML的格式,依次读取文档
            List<Node> beans = document.getRootElement().selectNodes("bean");  //拿到bean节点的集合
            for (Node node : beans) {       // node有多种子类型,每个bean的类型是Element
                Element ele = (Element) node;
                String id = ele.attributeValue("id");     // 每个bean都有两个属性,分别是id、class
                String className = ele.attributeValue("class");
                // 通过以上两个属性,基于反射技术,实例化Apple类
                Class c = Class.forName(className);     // 反射:读取到对应的类
                Object obj = c.newInstance();          // 通过默认构造方法,创建Apple类的实例
                // 目前,beanId有了,Apple类实例化对象有了
                iocContainer.put(id, obj);      // IoC容器对新创建的实例对象,赋予了beanId进行管理
            }
            System.out.println("IoC容器初始化完毕");
        } catch (Exception e) {
            e.printStackTrace();
        }
    }


    @Override
    public Object getBean(String beanId) {
        return iocContainer.get(beanId);
    }
}
3.测试
(1)
在应用入口类:
public class Application {
    public static void main(String[] args) {
        // 初始化IoC容器,此时会创建一个beanId是sweetApple的Apple类实例对象
        ApplicationContext context = new ClassPathXmlApplicationContext();
    }
}
结果为:
IoC容器初始化完毕(2)如何证明上述初始化IoC容器时,一个beanId是sweetApple的Apple类实例对象已被创建了?
public class ClassPathXmlApplicationContext implements ApplicationContext {

    // 用Map对象,作为IoC容器
    private Map iocContainer = new HashMap();

    // 在默认构造方法中,在对象初始化时,加载读取和处理XML配置文件
    public ClassPathXmlApplicationContext(){
        try {    // 1.获取配置文件的物理地址
            String filePath = this.getClass().getResource("/applicationContext.xml").getPath();
            // 如果物理地址包含中文,就会出现文件找不到的情况,因此应使用URL的解码
            filePath = new URLDecoder().decode(filePath, "UTF-8");
            // 2.根据物理地址,对配置文件进行解析
            // 利用Dom4j提供的SAXReader,来解析filePath对应的XML
            SAXReader reader = new SAXReader();
            File file = new File(filePath);             // 解析物理地址,得到一个File对象
            Document document = reader.read(file);      // 又得到一个XML文档对象
            // 3.根据XML的格式,依次读取文档
            List<Node> beans = document.getRootElement().selectNodes("bean");  //拿到bean节点的集合
            for (Node node : beans) {       // node有多种子类型,每个bean的类型是Element
                Element ele = (Element) node;
                String id = ele.attributeValue("id");     // 每个bean都有两个属性,分别是id、class
                String className = ele.attributeValue("class");
                // 通过以上两个属性,基于反射技术,实例化Apple类
                Class c = Class.forName(className);     // 反射:读取到对应的类
                Object obj = c.newInstance();          // 通过默认构造方法,创建Apple类的实例
                // 目前,beanId有了,Apple类实例化对象有了
                iocContainer.put(id, obj);      // IoC容器对新创建的实例对象,赋予了beanId进行管理
            }
            System.out.println(iocContainer);       // 打印出ioC容器中的对象,Map集合
            System.out.println("IoC容器初始化完毕");
        } catch (Exception e) {
            e.printStackTrace();
        }
    }


    @Override
    public Object getBean(String beanId) {
        return iocContainer.get(beanId);
    }
}
在应用入口类:
public class Application {
    public static void main(String[] args) {
        // 初始化IoC容器,此时会创建一个beanId是sweetApple的Apple类实例对象
        ApplicationContext context = new ClassPathXmlApplicationContext();

        Apple apple = (Apple) context.getBean("sweetApple");        // 调用写好的getBean方法
        System.out.println(apple);
    }
}
结果为:
{sweetApple=com.imooc.spring.ioc.entity.Apple@3581c5f3}         // 初始化IoC容器时,创建的Apple类实例对象
IoC容器初始化完毕

com.imooc.spring.ioc.entity.Apple@3581c5f3                    // 用getBean方法得到的是同一个Apple类实例对象
上述,从使用角度上看,跟Spring框架的IoC容器初始化的过程几乎一样。
也演示了Spring框架的IoC容器如何使用反射来创建对象,并使用反射为对象的属性进行赋值注入。
5.6 模拟IoC容器,基于反射通过setter方法,完成属性注入
因为一个bean对象中,定义了三个property。还需要在IoC容器中,基于反射,通过set方法进行属性注入。
利用property 来属性注入,本质是通过setter方法来完成的
public class ClassPathXmlApplicationContext implements ApplicationContext {

    // 用Map对象,作为IoC容器
    private Map iocContainer = new HashMap();

    // 在默认构造方法中,在对象初始化时,加载读取和处理XML配置文件
    public ClassPathXmlApplicationContext(){
        try {    // 1.获取配置文件的物理地址
            String filePath = this.getClass().getResource("/applicationContext.xml").getPath();
            // 如果物理地址包含中文,就会出现文件找不到的情况,因此应使用URL的解码
            filePath = new URLDecoder().decode(filePath, "UTF-8");
            // 2.根据物理地址,对配置文件进行解析
            // 利用Dom4j提供的SAXReader,来解析filePath对应的XML
            SAXReader reader = new SAXReader();
            File file = new File(filePath);             // 解析物理地址,得到一个File对象
            Document document = reader.read(file);      // 又得到一个XML文档对象
            // 3.根据XML的格式,依次读取文档
            List<Node> beans = document.getRootElement().selectNodes("bean");  //拿到bean节点的集合
            for (Node node : beans) {       // node有多种子类型,每个bean的类型是Element
                // 3.1读取beanId,创建Apple类实例化对象
                Element ele = (Element) node;
                String id = ele.attributeValue("id");     // 每个bean都有两个属性,分别是id、class
                String className = ele.attributeValue("class");
                // 通过以上两个属性,基于反射技术,实例化Apple类
                Class c = Class.forName(className);     // 反射:读取到对应的类
                Object obj = c.newInstance();          // 通过默认构造方法,创建Apple类的实例
                System.out.println("IoC容器实例化对象完成");
                // 以上,beanId有了,Apple类实例化对象有了

                // 3.2 因为一个bean对象中,定义了三个property。还需要在IoC容器中,基于反射,通过setter方法进行属性注入。
                List<Node> properties = ele.selectNodes("property");
                for (Node p : properties) {
                    Element property = (Element) p;
                    // 提取每一个属性中的name、value
                    String propName = property.attributeValue("name");   // 读取name属性(变量)
                    String propValue = property.attributeValue("value"); // 读取value属性(变量)

                    // 运行时,基于反射,动态注入属性:通过动态调用setter方法
                    String setMethodName = "set"+propName.substring(0, 1).toUpperCase()+propName.substring(1);
                    System.out.println("准备执行"+setMethodName+"方法来注入数据");
                    // 基于反射,通过上述方法名,来完成调用
                    Method setMethod = c.getMethod(setMethodName, String.class);
                    setMethod.invoke(obj, propValue);       // 将属性注入到obj:调用的是obj的setter方法,传入的参数是propValue
                }
                // 以上,三个属性,已注入到Apple类的实例化对象obj中了。

                // 4.IoC容器对新创建的实例对象,赋予了beanId进行管理
                iocContainer.put(id, obj);
            }
            System.out.println("IoC容器初始化对象完成:"  +iocContainer);       // 打印出ioC容器中的对象,Map集合
            System.out.println("IoC容器初始化完毕");
        } catch (Exception e) {
            e.printStackTrace();
        }
    }


    @Override
    public Object getBean(String beanId) {
        return iocContainer.get(beanId);
    }
}
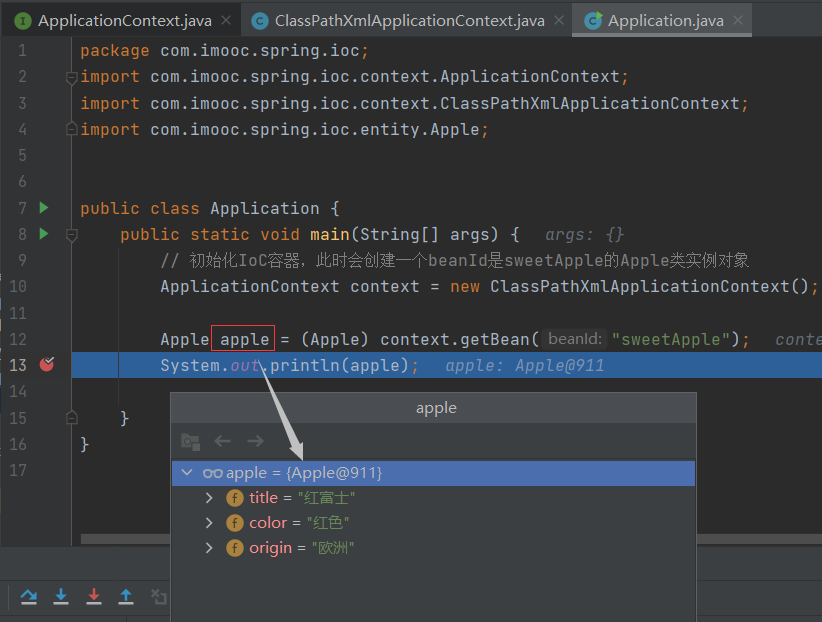
断点调试:
apple对象中,已经成功实现了三个属性的注入:
查看控制台:
可知:IoC容器实例化(创建)对象后,立即执行了setter方法,来实现属性数据注入。
IoC容器实例化对象完成
准备执行setTitle方法来注入数据
准备执行setColor方法来注入数据
准备执行setOrigin方法来注入数据
IoC容器初始化对象完成:{sweetApple=com.imooc.spring.ioc.entity.Apple@1f554b06}
IoC容器初始化完毕
IoC容器本质就是个Map集合对象,里面有很多的键值对。将beanId与对应的对象进行绑定。
在容器初始化过程中,遇到了对象实例化,就去基于以下反射技术,来实例化创建对象:
         Class c = Class.forName(className);     // 反射:读取到对应的类
         Object obj = c.newInstance();           // 通过默认构造方法,创建Apple类的实例对象
遇到了property属性标签,就使用Method对象,来实现setter方法的动态调用。
综上所述,模拟了一个Spring框架 IoC容器的基础实现。








Comments | NOTHING